
.png)
Webflow: Insights and Tutorials

Webflow plugins Overview
Webflow is a robust no-code tool to build performant websites visually. But, we can further enhance Webflow's capabilities with third-party apps or Webflow integrations. Webflow offers a straightforward way to integrate plugins and integrations.
Integrations are essential because website owners and businesses have specific goals, like increasing conversion or page views. These goals call for specialized software that can do the job well.
The types of integrations
Webflow supports integrations across several categories to monitor traffic, avoid spam, support email marketing, and cloning of resources. Here are the types that we think are essential from a business standpoint.
- CRM integrations
- Ecommerce integrations
- Payment processor integrations
- Content marketing integrations
- Chat support integrations
- Social Media integrations
- Membership integrations
- Analytics and Optimization integrations
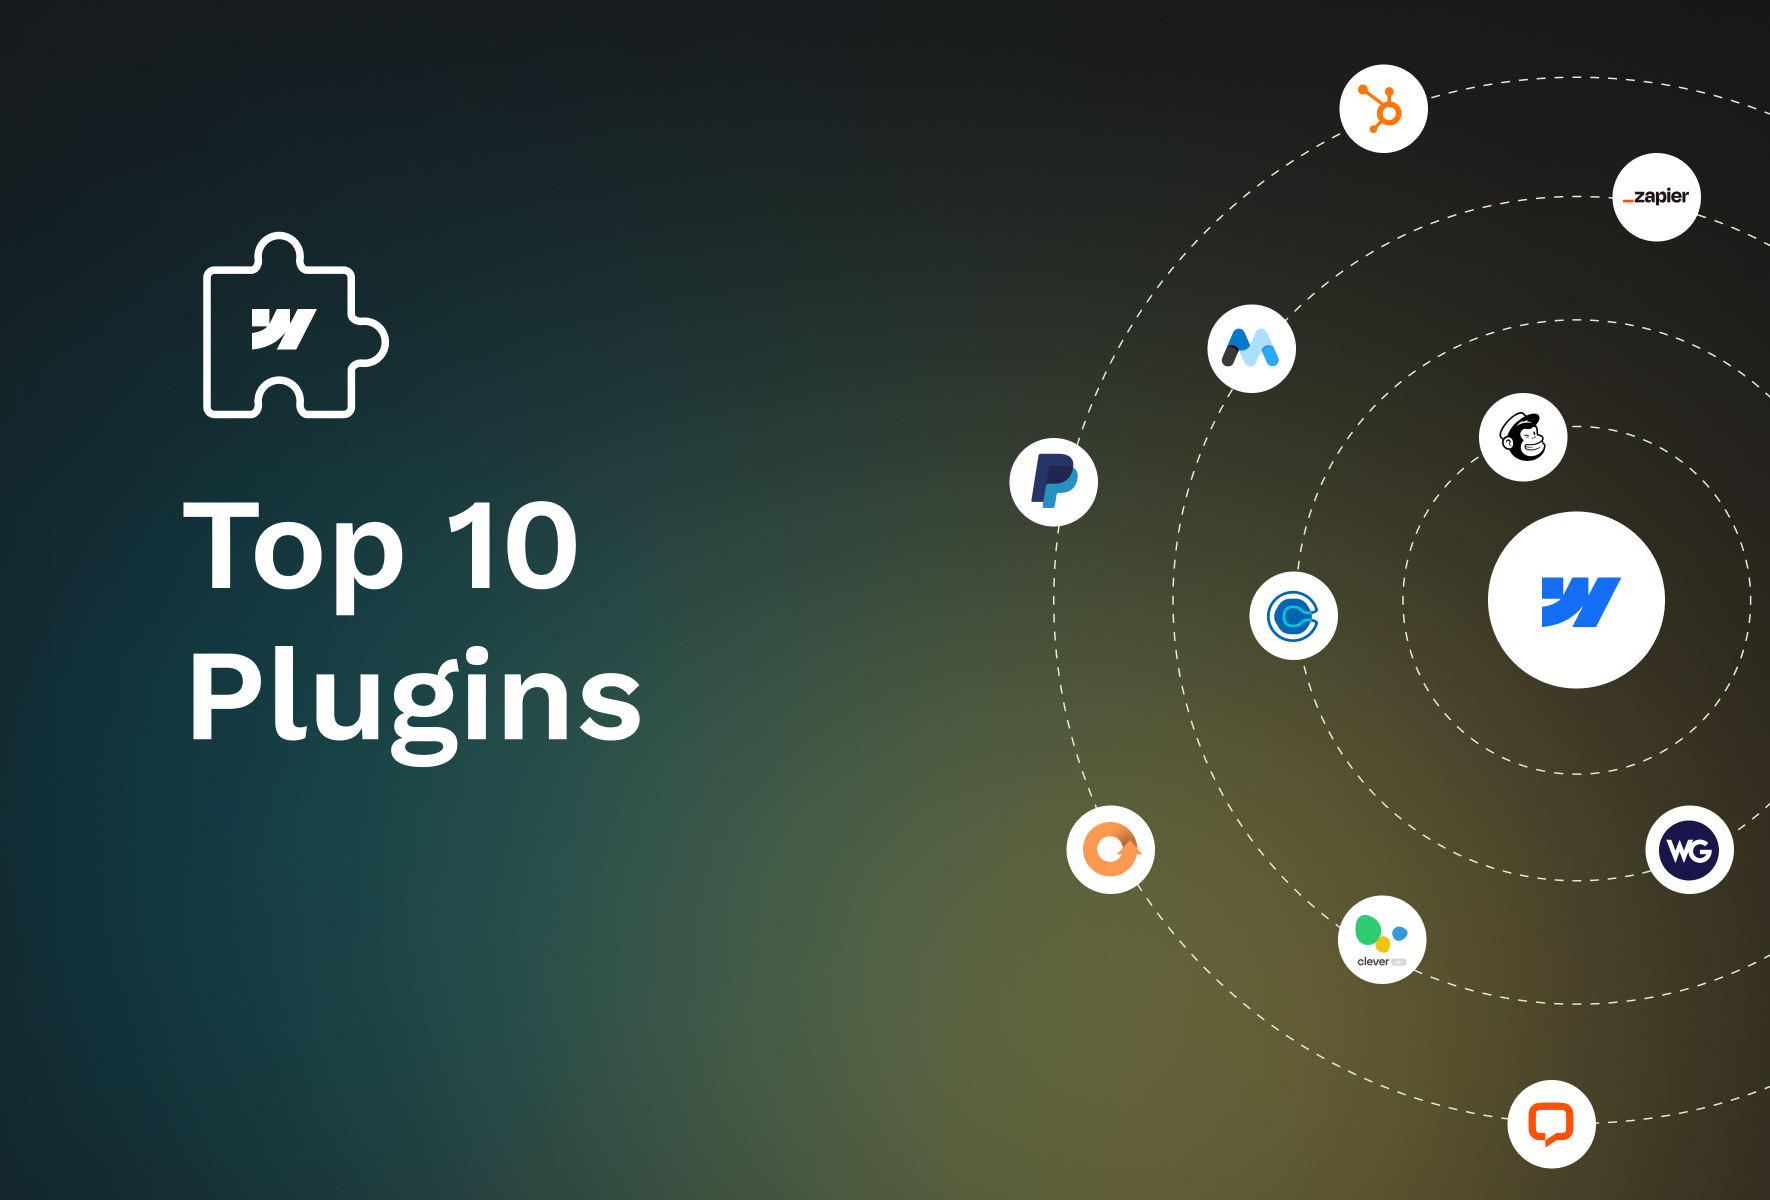
Top 10 picks
This blog covers the essential plugins that will help you cover ground on the most significant business aspects. Let's look at the ten plugins that are a must in your integration arsenal.
Zapier

A powerful no-code tool that enables automated workflows tailored for your business. With a simple drag-and-drop editor, you can build complex long-winding workflows involving 100s of actions and dozens of apps.
You can create webhooks and send/receive data from any app without servers using Zapier. You can also enable alerts on business-critical events like failed authentication.
It offers enhanced security provisions and single sign-on for your employees. Plus, Zapier allows you to integrate 1000s of other tools and apps to make your Webflow websites more efficient.
Hubspot
Hubspot is a dynamic CRM tool that integrates with Webflow websites. It aids in tracking sales activity with prospect tracking, email tracking, and live chat. In addition, it offers pipeline management, lead rotation, follow-ups, sales call scheduler, recording, etc., to increase conversion.
You can track and analyze your sales reps' performance too. More so, you can analyze all interactions that the system recorded on all channels. In a nutshell, You can have a comprehensive overview of the entire sales funnel.
The forever free version of the tool is suitable for small businesses, and enterprises can pay for the software.
Mailchimp
The go-to email marketing tool that offers automated and personalized emails with customer journey builders. You can also conduct split tests to refine your marketing campaigns and use segmentation to reach the correct audience.
The tool also offers insights based on analysis of countless other emails sent. It also helps optimize your email content, layout, and CTAs for higher campaign conversion.
Memberstack
Memberstack is an impressive tool that allows you to build member-only areas on your website. In addition, you can customize the login screen and authenticate the user. It accepts payments using several leading payment processors in dozens of currencies.
Finally, Memberstack allows you to scale seamlessly as your user base grows.
Paypal
Paypal integration is crucial for businesses to receive money securely worldwide. Be it an eCommerce store or portfolio website, you can earn by accepting all leading credit cards and Paypal money on SSL encryption.
Paypal operates globally and can accept payment in 100+ currencies for a global brand. It also offers buyer protection and fraud monitoring services for tighter security. Paypal also accepts all major credit, debit cards, and regional payment methods.
Calendly
Are you offering a service or SaaS tool? If getting your website visitors to book a call is critical to your business, then you can integrate Calendly. People can book calls based on availability. This saves time on the back-and-forth to determine availability and time zone differences.
Also, monetizing the call is possible by setting up a payment link in Calendly itself. This feature is crucial to people providing consulting services through their websites.
Google Analytics
You can integrate your Webflow websites with Google Analytics to track online traffic. The analytics tool also analyzes website performance metrics. More so, it doubles as a marketing and SEO tool. It helps to analyze user behavior and segment the users to formulate more refined marketing strategies.
The tool helps generate tailored reports for specific KPIs for uncovering hidden insights. For instance, monitoring user actions for eCommerce stores, so you can offer targeted offers. Google Analytics is a potent and popular tool to nail your performance and marketing.
Weglot
Weglot is a leading localization service that integrates with Webflow websites to display and manage translated websites. The tool can offer translation in 100 languages using machine learning. Additionally, you can add human translators to the project and build a glossary for each language.
Visitors are automatically redirected to a specific website in the language subdomain based on their browser settings. More so, Weglot also offers multilingual SEO and localized customer journeys.
Cleverads
If you need to place ads on your website, Clever is a free Google ads tool. It helps launch, track and optimize Google ads for enhanced revenue by managing the campaigns easily. In addition, it helps audit Google ads for increased conversions.
Cleverads also supports Microsoft ads creation and management. It also features a keyword planner and banner creator to find everything in one place.
Clever can be integrated with the help of Zapier.
Livechat
Livechat offers an omnichannel chat service for better customer engagement. You can better streamline online chat with the help of automation and human agents. Automated chats allow for 24*7 availability.
More so, chatbots can generate tickets and route them to a human user who can provide personalized recommendations for more revenue. Major corporations like Ikea and Paypal use this leading app.
Bonus: Optomate
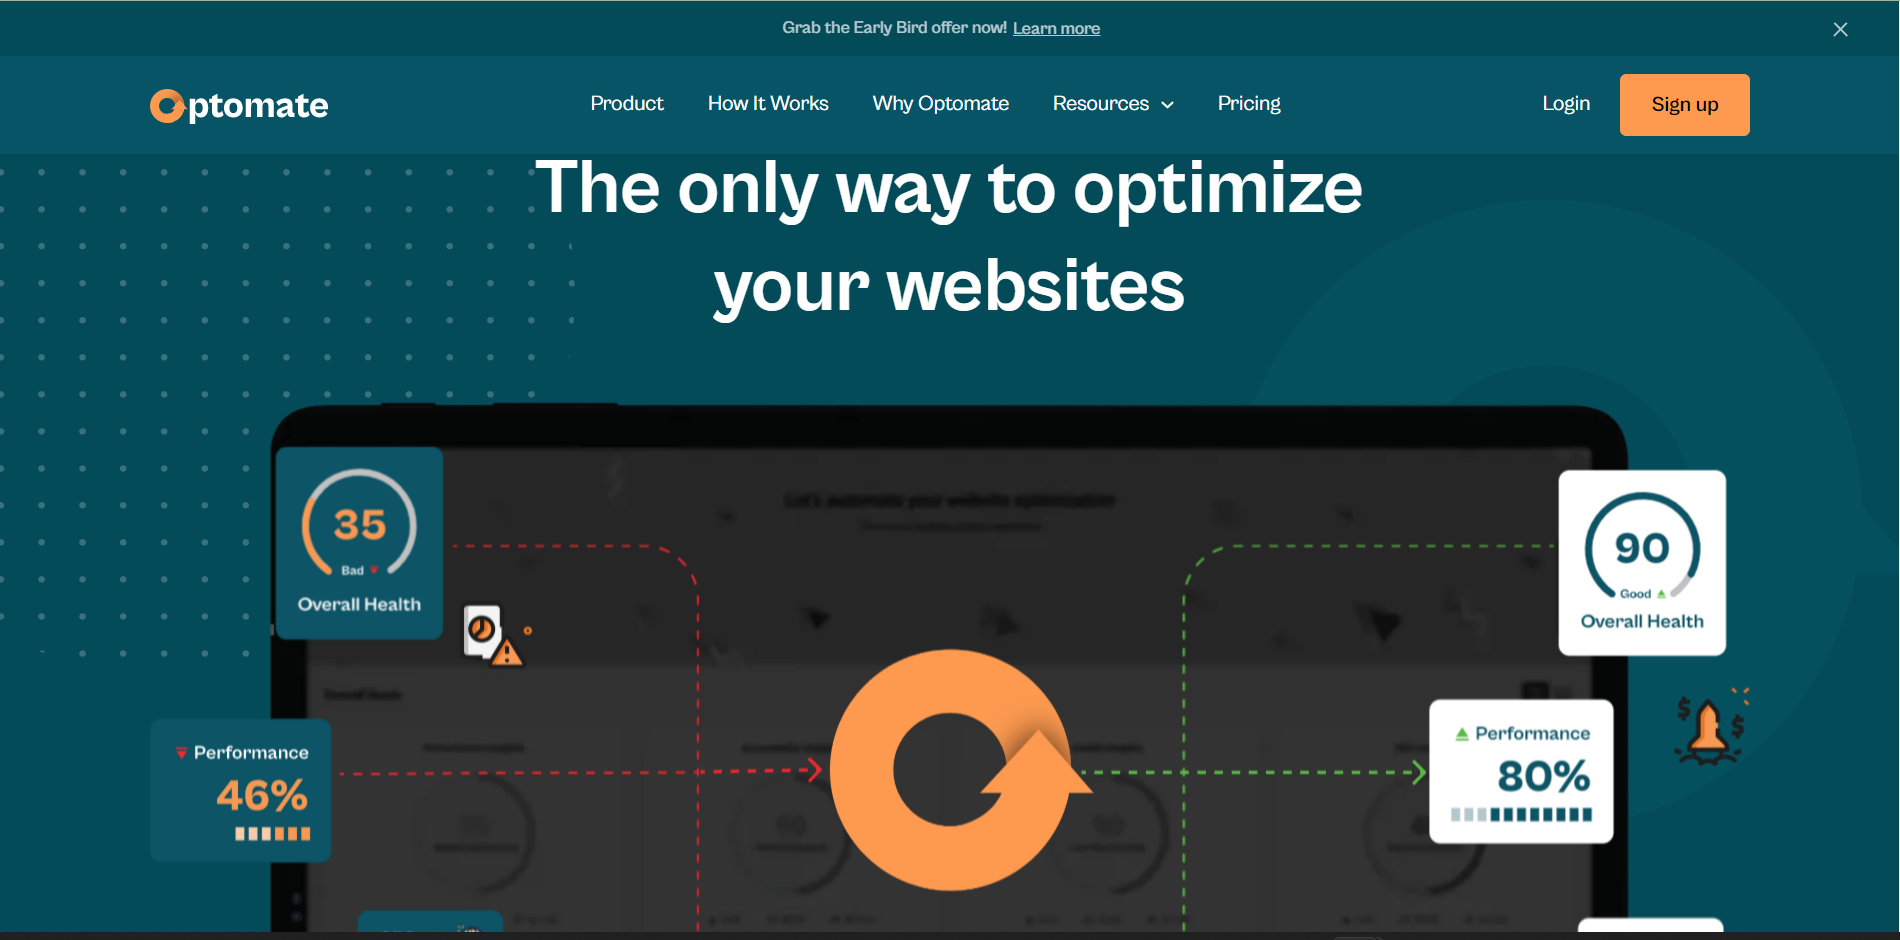
Optomate is a relatively new player but a potent one. It supports automated tracking for website KPIs. It analyzes websites to offer insights on optimizing websites. The tool is designed to fix the website's performance, SEO, security, and accessibility from a single dashboard.
With Optomate there will be no more sub-optimal website performance. In a world that’s going more digital by the minute, a website that keeps up with the times and with your business is more important than ever. There’s now a simple solution, and it will ensure that your business gets a competitive edge in the market.
Conclusion
These tools offer greater flexibility and functionality to get the best of Webflow websites. You can pick the tools that best serve your purpose. Many tools offer free trials for you to get started.
Suppose you're facing issues integrating any third-party apps with your Webflow website. We have done it for dozens of our happy clients. We'll be happy to do it for you too.
.png)
Sliders are an excellent way to demonstrate testimonials, product features, product variants, and such. In addition, they offer captivating visuals for retail, tourism, portfolio, news website, etc. But, the question is how to create sliders?
Webflow offers a straightforward way to include sliders in your web designs. Additionally, thanks to Webflow's visual builder, you can customize the Sliders up to pixel precision. Adding interactions and animations is easier than doing so in traditional web technologies.
This blog covers a simple Webflow slider tutorial on what and how of Sliders in Webflow. Read on to find more.
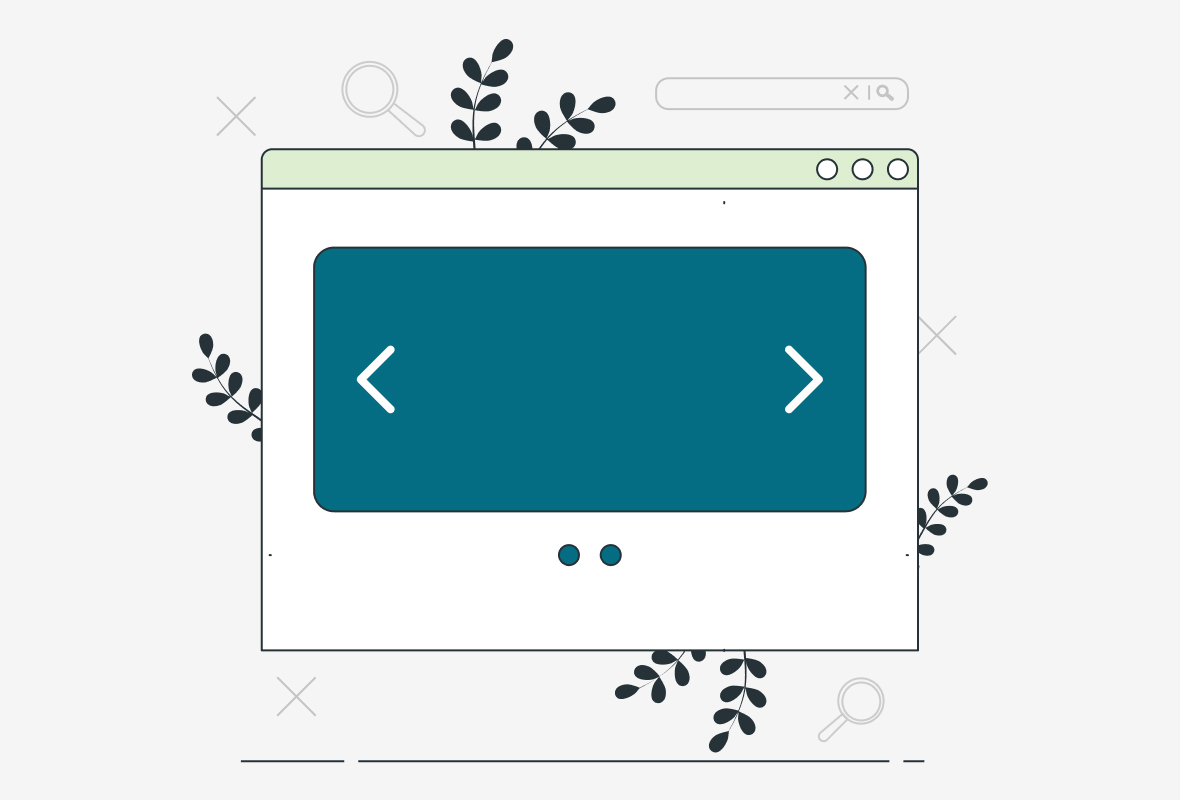
Anatomy of a Slider
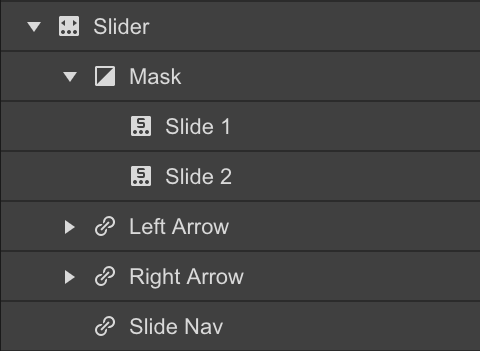
The slider has four components or children -
- The Mask contains two slides by default.
- The Left Arrow
- The Right Arrow
- Slide Nav or the slider navigation represents our position in the carousel.
Create a Slider
You can drag and drop a slider from the Elements panel into the page. The slider will occupy the entire width of the parent elements it's dropped in.
Besides the two slides that we already have, you can add more slides. Then, you can either duplicate the existing slide by right-clicking the slide. Or, select the slide in the Navigator panel and perform copy-paste on the slide.
A third way to add a slide is via the Element Settings panel in the right sidebar. You can select the button - Add more slides in the Slide settings tab.
You can access all the slides on the page by clicking the slide nav and via the left and right arrows. Or you can also use the arrows in the Slider settings.
Edit a Slider
After adding as many slides as required, it's time to edit them. Sliders like Sections can contain other Components like paragraphs, buttons, or containers. Therefore, sliders make an excellent option for holding images, videos, and content.
Here's how to do it.
Adding Background Image
You can add an image element to the slides. However, that doesn't offer us proper control, like adding content on top of the image.
So, we will begin by making a class for the slider and then adding a background image. Now, you can start editing the image. First off, turn off the tile settings. The size of the image can be set in pixels. Or, there are two other smarter solutions -
Contain: The image will fit entirely into the slider without being cropped so that we may have a space around the image.
Cover: The image will cover the entire slide width, and it might get cropped from the corners to fit the aspect ratio.

You can change the hierarchy of a slider by moving it upwards/downwards on the Navigator Panel. In addition, you can edit the slider to behave like a section and occupy 100% of the viewport if you want it.
Adding Content to Slider
You can start off by adding a container to hold all the content correctly in the slide. Then, you can add headings, paragraphs, buttons, and images. You can add combo classes to each slide to modify the styling properties and content. You can copy and paste the container from the first slide to another slide, to build upon existing designs.
You can copy and paste an element from another project to your current page using CTRL+C and CTRL+V for Windows or CMD+C and CMD+V for MAC users.
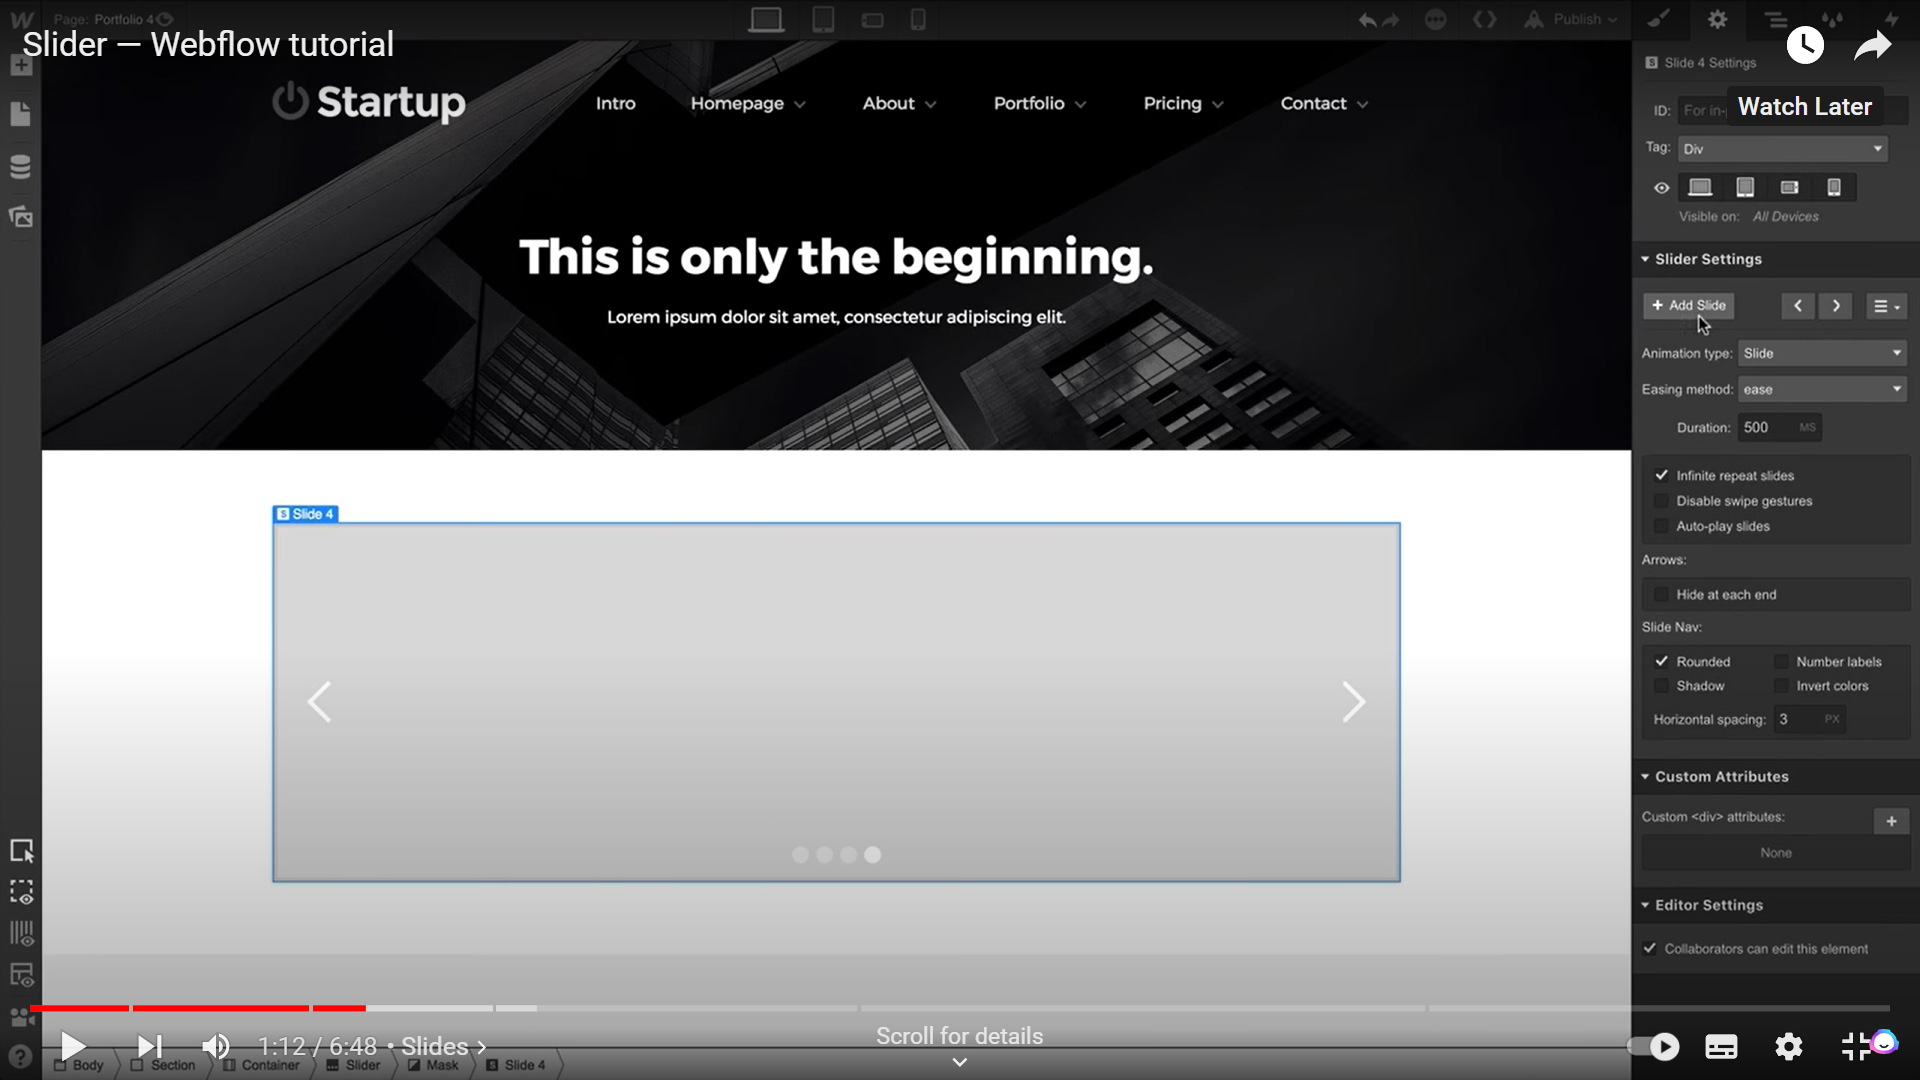
Apply Settings
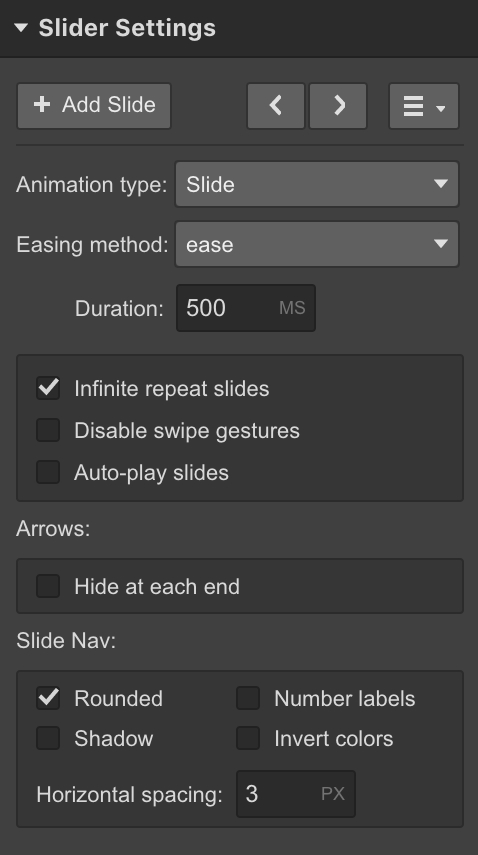
You can edit the settings in Slider settings to control how your slides behave.
- Animations: Configure the animation type to set how slides will appear when in motion.
- Easing Method: Set how slides transition by changing the easing method
- Duration: Set the time the slider takes to jump to another slide.
- Swipe Gesture: Control your slider's behavior on touch devices by turning on/off the swipe gestures.
- Autoplay: Set the time lag after which the first slide should change into the next without the user's input. Control when the slider stops displaying the next slide on the loop.
- Hide at each end: Hide the left arrow on the first slide and the right arrow on the last slide for a more intuitive user experience.
- Slide Nav: Change the size, shape, and color of the Nav buttons.
Customize Slider
You can customize the slider for enhanced customer experience and visually appealing interface. These are the customizations available.
Resize the slider
You can resize the slider by editing the viewport height. In addition, if the background image is set to Cover, it will resize accordingly.
Alternatively, you can change the parent element so that slider resizes to fit the parent element.
Customizing arrow icons
You can customize the arrow icons by turning them into class. Then apply settings to the class and edit the font color and font size to best suit your needs. Now, apply the class to other arrow icon elements as well.
Replacing arrow icons
Within the left or right arrow elements, delete the icon element. Now, you can drag and drop your chosen image into either of the arrow elements to get a custom arrow icon.
You can also set a hover image for your left and right arrow icons by using Filters or changing the opacity.
Styling the Slide Nav dots
You can alter the size of the dots or number labels by changing the font size. To change the color of the dots, you have to embed custom CSS into your code -
Consider,
.w-slider-dot is the class of dots, and
.w-slider-dot.w-active is the class of active dots.
<style>
.w-slider-dot {
background: blue !important;
}
.w-slider-dot.w-active {
background: navy !important;
}
</style>
Similarly, to edit the shape of the custom Nav dots, you need the following CSS code
<style>
.w-slider-dot {
background: blue !important;
}
.w-slider-dot.w-active {
background: navy !important;
}
</style>
Change the color of the dots using the following embedded CSS code
<style>
.w-slider-dot {
background: #4353FF !important;
border: 3px solid #4353FF !important;
}
.w-slider-dot.w-active {
color: #4353FF !important;
background: none !important;
border: 3px solid #4353FF !important;
}
</style>
Here’s how the output will look like:

Hiding slide elements
You can also hide slide elements. Select the element like arrows and change the display settings to None.
If you want to turn the dots into squares, you can go to slider settings, then to the slide nav section and toggle the rounded settings to off.
Show multiple slides at once
You can also display multiple slides to make it a carousel slider. You can do so in the following steps -
- Add a slider
- Create the same class for all slides
- Set the width of the slide to 33.33% to show three slides on the desktop.
- Set the width to 100% to show three slides on a mobile screen.
- Customize each slider by adding a unique combo class
Using Collection Items
Sliders can't use dynamic data. However, you can use Collection lists to populate sliders.
- Connect the first slide to the Collection list.
- Limit the items displayed on the Collection list to one.
- Duplicate the slide and change each corresponding slide's "Start at" number.
- Now, your slide 1 corresponds to 1st item, 2nd slide corresponds to 2nd item in the Collection list, and so on.
Conclusion
We have covered everything you need to know about creating interactive sliders for your web projects.
However, designers must note that sliders must be usable and accessible. The users operating through the keyboard or voice input software must be able to interact with the slider. Plus, users must be able to pause sliders to read text, if any.
The space they occupy must not disrupt the user experience, which often happens if the sliders are inserted for the sake of it instead of evaluating their need objectively.
Are you unsure of how to create usable and accessible web projects?
We have created several such exciting web solutions in the past and will be happy to help you too. You can always talk to us.

Ecommerce is set to rise exponentially in the coming years, as per research by Morgan Stanley. The eCommerce market will grow up to $5.4 trillion in 2026. Of course, this could mean more competition and more profits too.
So, the question is, how do you stand out from the competition and remain profitable?
You need a highly intuitive and scalable store that you can build fast and start selling. In addition, the store must cater to your industry requirements and serve exceptional customer experience. Webflow is one platform that perfectly fits the bill.
Webflow offers the full power of HTML, CSS, JavaScript, and Vibranium to build spectacular, scalable, and immersive eCommerce solutions. Webflow has recently unveiled new eCommerce features as well to serve eCommerce store owners.
Initial Steps:
But, building an eCommerce store can be overwhelming for anyone. So, you first need to figure out the needs of the market. Then, you research suitable products and figure out your positioning in the market as opposed to your competitors.
You can either manufacture the product yourself or be a reseller. The last steps are managing logistics and packaging for your products.
If you offer digital services instead, you can do away with packaging and logistics.
After you've done your homework, now is the time to start building your store.
Step-by-Step Guide
Here’s a breakdown on how to build an eCommerce store using Webflow.
1.Build a Collection
Your eCommerce store needs products to sell, and you can showcase those products by building a collection.
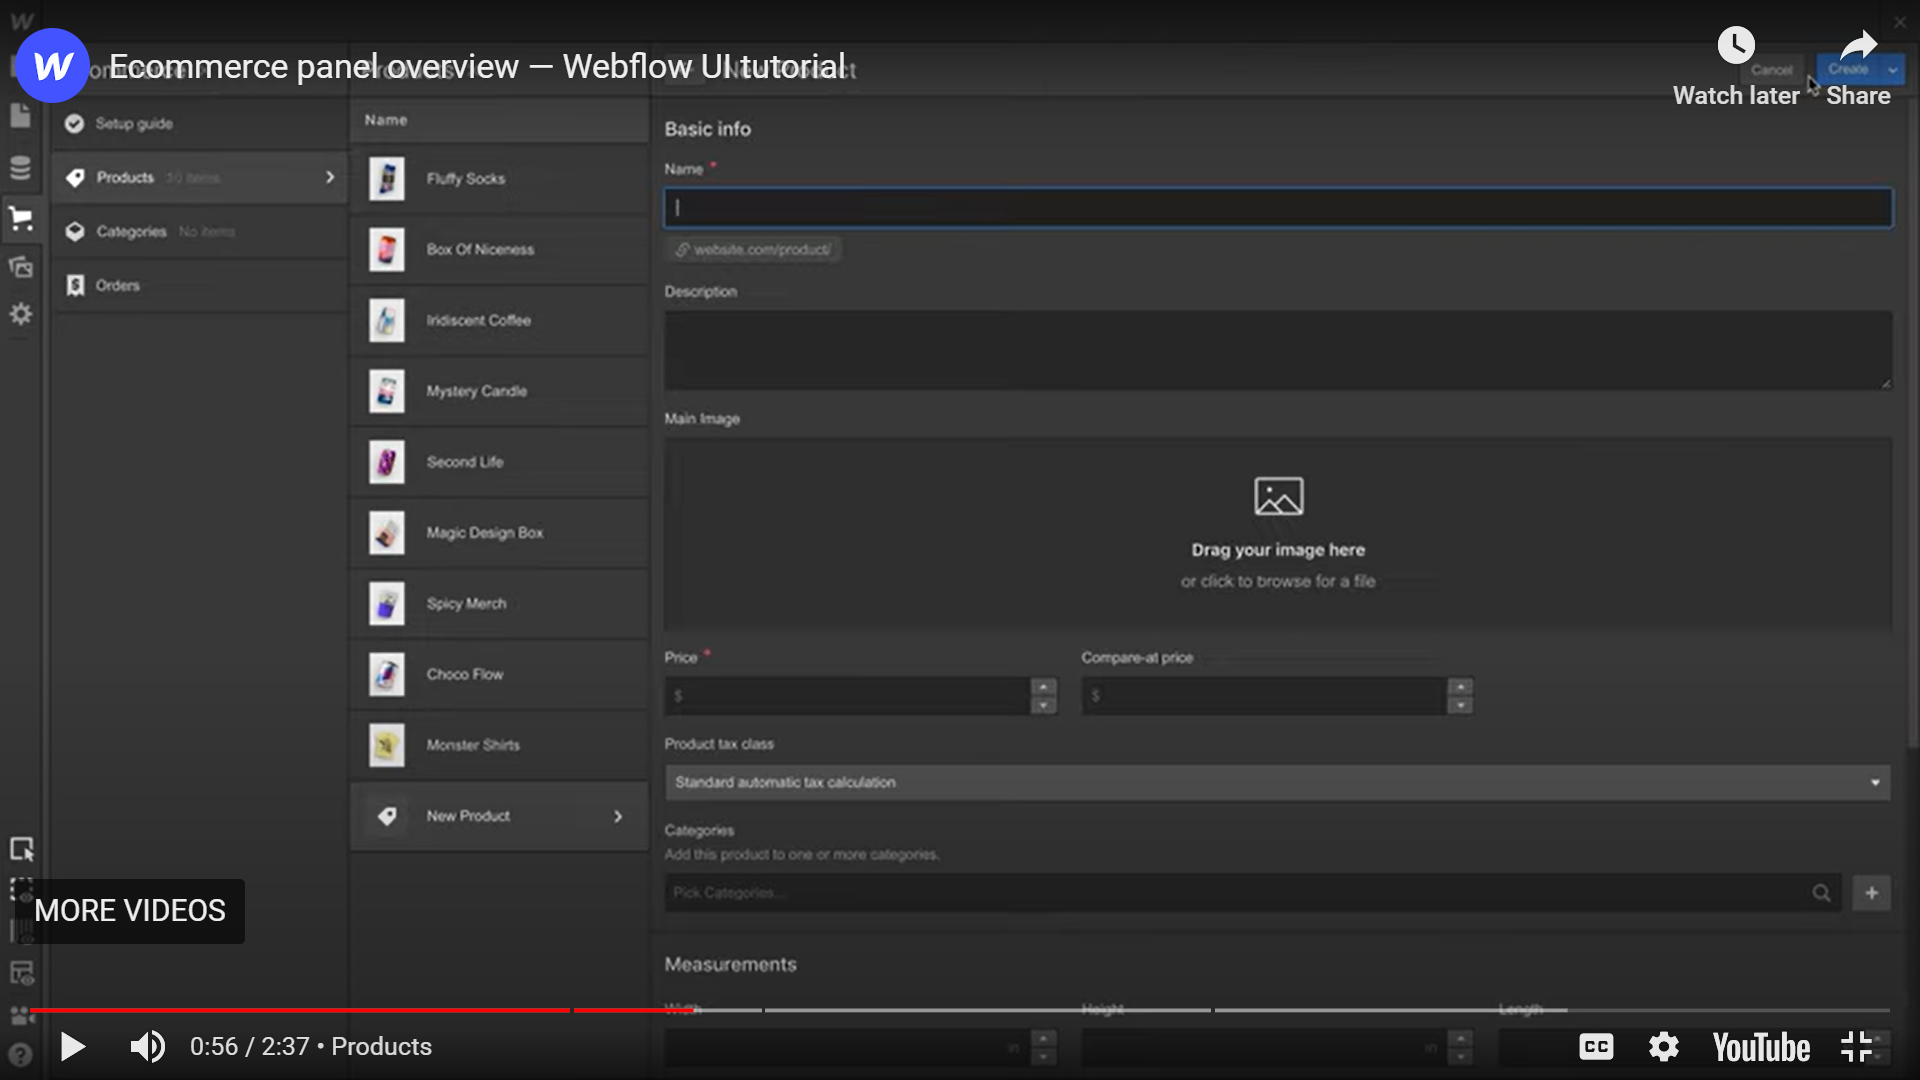
You can go to Products and add products from the eCommerce panel manually. You can name the product, add a description and price for each product in your store, and press Create. You can also bulk import your products using a CSV file.
You may also need to organize these products into categories. You can add Categories from the products page. Alternatively, you can go to the Categories panel in the eCommerce store and create new categories first and later add products. Finally, you can import and export products.
It's also possible to add custom fields to each of your products. These fields can range from rich text to references to links. This makes it easier for you to describe your product aptly. Plus, it's easier for your customers to get a complete picture of your product at a glance. You finally save the Collection.
2. Customize cart button
After adding products, it's time to enable shopping by adding a cart button. Webflow allows you to customize the icon, text, and cart quantity. You can start by changing the icon color per your brand guidelines. Make sure you select the icon in Navigator or Canvas. You can pick any color and change it.
You can also edit the text block to read differently instead of just saying Cart. One way to do so is by checking the "Get text from Cart" which lends you two options:
- To display the quantity
- To display the subtotal
You can also style the cart quantity field and control its visibility on the cart button if the cart is empty. However, you can't delete the cart quantity element.
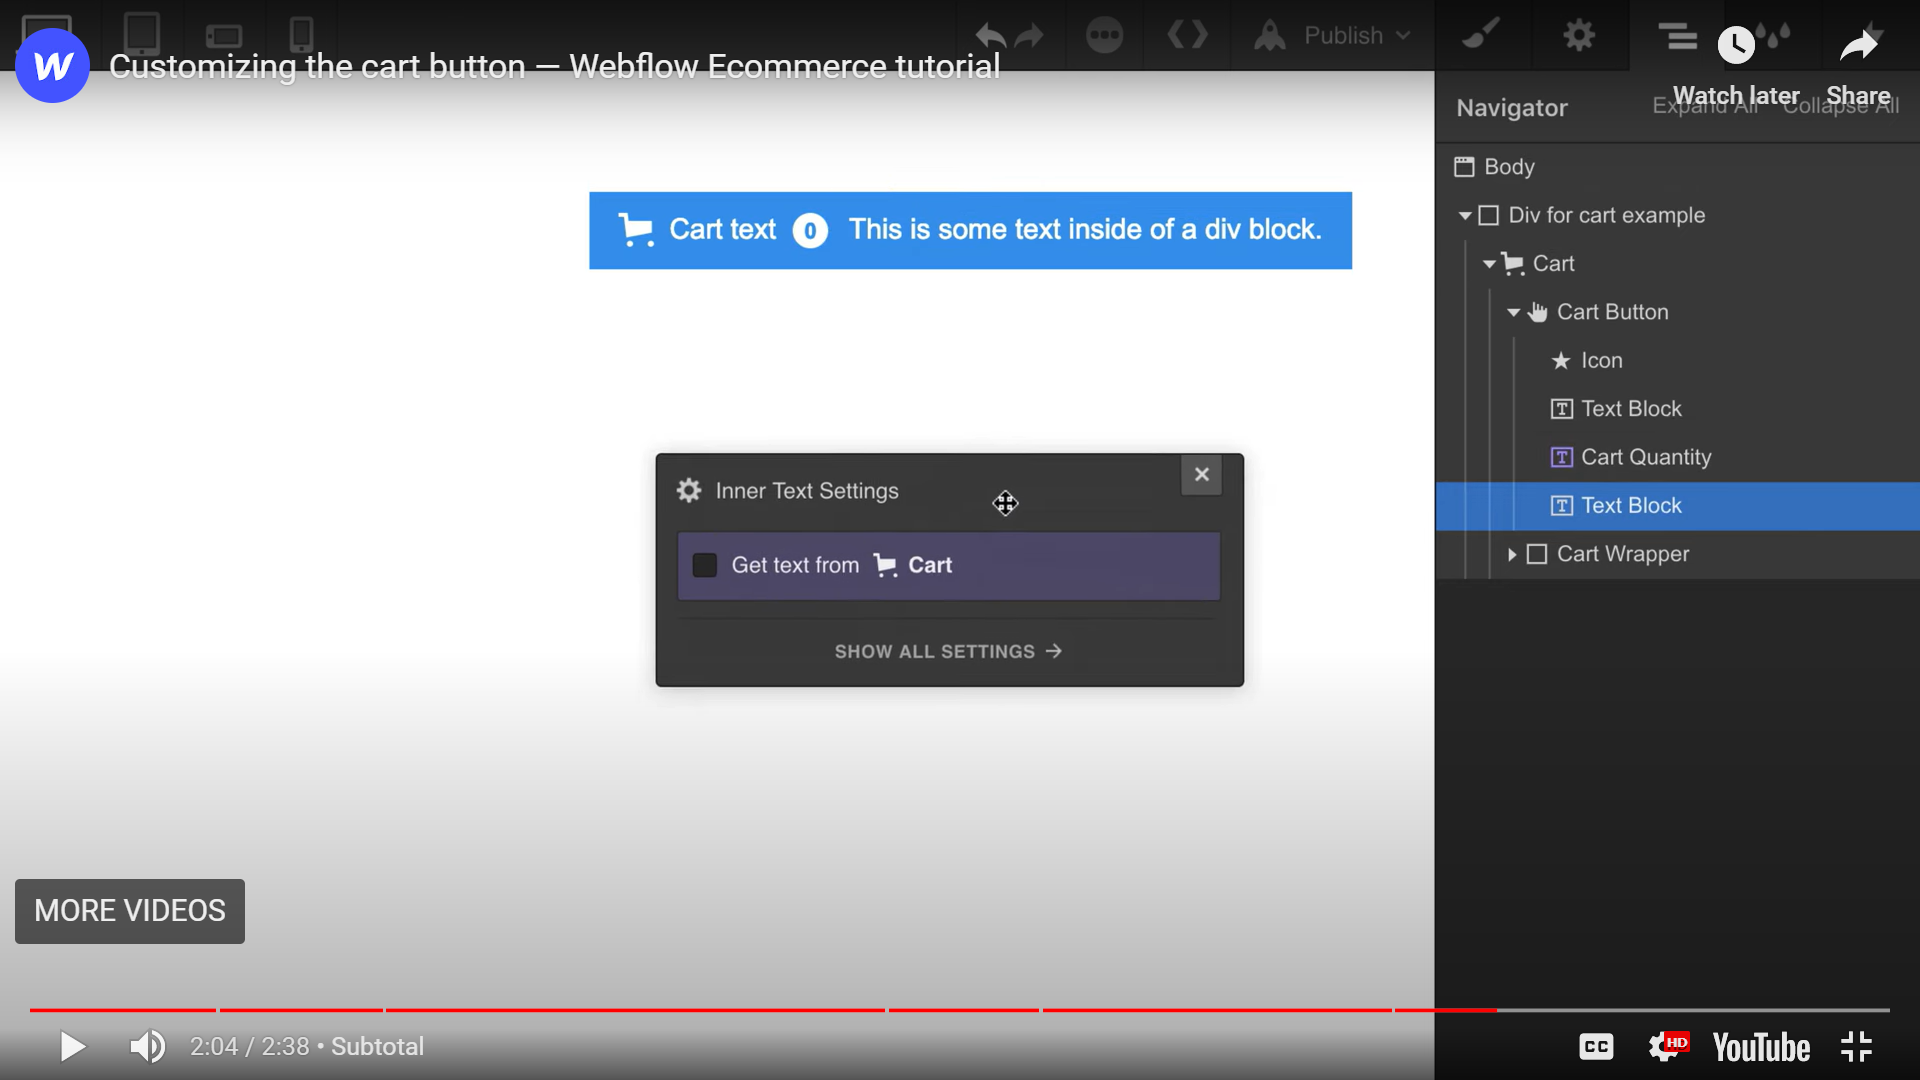
You can also add elements to the cart button. For example, suppose you want to display the cart's subtotal on the button. You can do so by adding a text block.
3. Add to Cart
Select the Add to Cart button from the lower navigation bar. Then, you can access the settings in the right Element settings panel.
There are three states of add to cart Button -
- Default - This is the button's default state once you add it from the Add (+) button on the left sidebar. You will see that a product variant dropdown is automatically added on the screen.
- Out-of-stock - Out-of-stock state represents when the product is unavailable. You can customize the text and the styling too.
- Error State - There will be times when an error would hamper the buying process. For instance, a product not being available for a variant. You can edit the error message and also restore the default message.
You can access the states of the cart with keyboard shortcuts of the left and right keys. The shortcut works because the states of the cart are siblings, and Webflow allows access to siblings with left and right arrow keys.
4. Create product variants
Webflow allows you to create custom fields for products that better describe and represent the product to your customers. This is quite a useful feature, not available in many other eCommerce builders. You can add options when you add a new product, together with a Name and Description. Options are equivalent to different product features.
Suppose, for instance; a clothing item will have Options like color, size, gender, occasion, etc. Once you add these Options, Webflow will automatically add variants based on these features along with a drop-down on the products page.
5. Customize eCommerce emails
Email marketing generates an ROI of $36 for every $1 spent. That number is higher than any other marketing channel. More so, personalized emails have a 5.7% higher open rate than non-personalized ones. In addition, you can send customized emails to your customers within your Ecommerce store without the need to integrate another ESP.
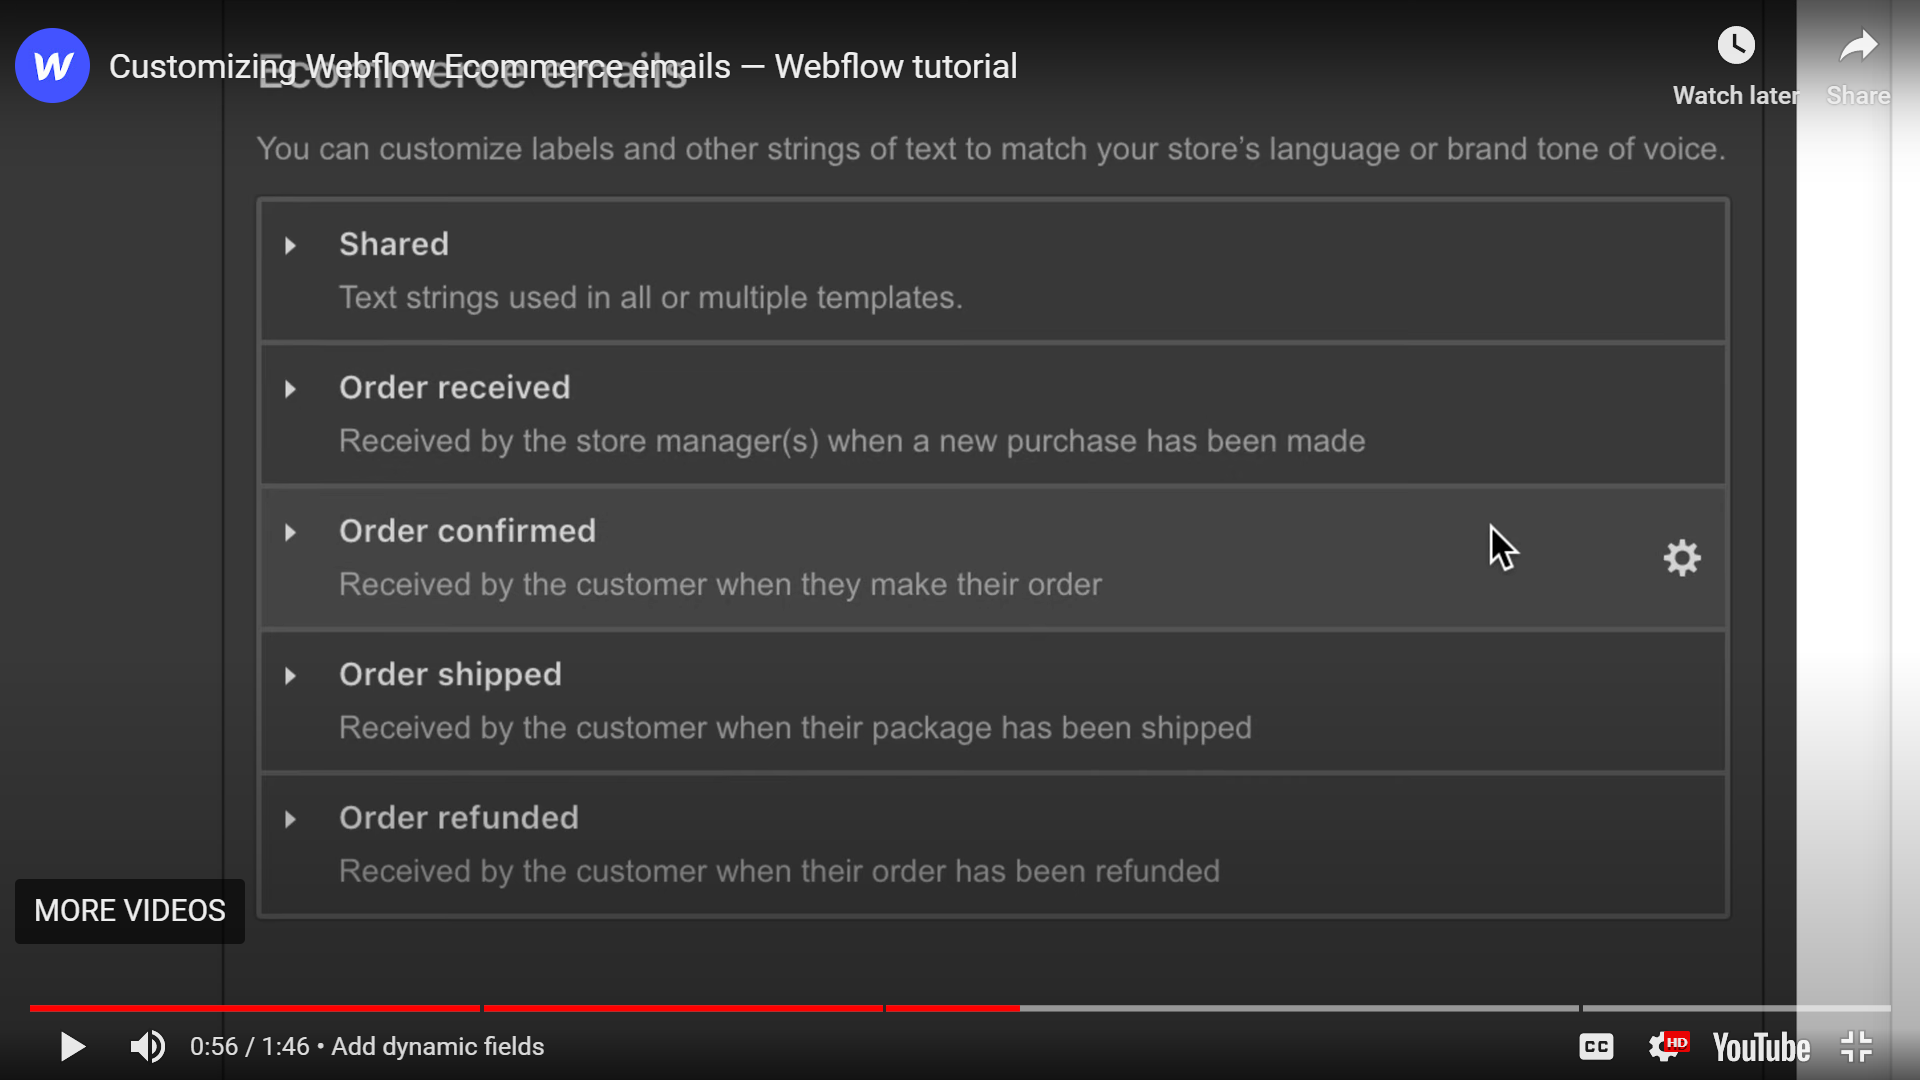
You can create branded emails by adding brand colors to background colors and accent colors. You can also add your brand's logo and hide the Webflow branding in the footer. Finally, you can add fine print text for your emails to share other details like contact.
You can add static text and dynamic fields in the email. For instance, you can add dynamic fields like customer names to personalize emails. This will help save you time even when you're mass scheduling and give you the benefits of customization.
Additionally, you can also send the Test email. However, you can also see the preview of emails while you're working on them.
6. Launch your online store
Once you have created product categories, you can launch your store. But there are a few more steps:
- Choose site plan: Go to your Project Settings and choose the Hosting option for your store.
- Enable SSL: Under the Hosting tab, you will see a toggle button to enable SSL. You must enable this to offer secure payment processing to your customers.
- Add payment provider: Form your Ecommerce panel, access Settings, and select the Payments option. You can add Stripe payment methods to your store. Other options available via integrations are Google pay, Apple Pay, and Paypal.
- Enable checkout: From the Ecommerce settings, select the Checkout tab and toggle the button to enable checkout.
- Publish on webflow.io In case you need to test your store in an online environment. You can publish on Webflow.io to verify if your store is functioning optimally.
7. Design Your Store
The above-listed steps cover the underlying framework of the eCommerce store. But, one important piece of the puzzle is the user interface that can make a huge difference to your eCommerce store.
After adding products, you will notice that a Product template has already been created. Therefore, you can begin by selecting the add symbols (Component) from the pages panel. Then, you can build layouts from Section, Container, and Grid elements as per your requirements.
From here on, you can use structural elements like div blocks, text blocks, buttons, etc., to contain different parts of products. And design all CSS elements like padding, margin, typography, etc., from the right sidebar in Element Settings. You can edit the Dynamic Style settings to set background images, color, etc., by pulling the same from the fields in the product collection.
The easiest way to build all your product pages is to create classes for each piece of the product page and pull data from different fields like description, price, quantity, etc.
So, in a nutshell, you only design once and bind content to class so that all your product pages are built automatically consistently.
Conclusion
Webflow offers a tonne of options to build an on-brand eCommerce store. It's an easy, fast, and efficient way to launch an eCommerce store that understands the inherent needs of modern and scalable eCommerce stores.
You can benefit from unique features like custom product variants, personalized emails, tax calculations, and so on to create an eCommerce store that's easy to manage and scale.
If you need assistance in building your eCommerce store, you can get in touch with us here.

Webflow is a visual builder, and the interface that allows users to do so is Designer. Webflow Designer is both for developers and designers alike. In fact, the power of no-code is one of the top reasons why we use Webflow, and you should too.
If you're looking for a Webflow Designer tutorial, keep reading as we give a brief overview of how to use Webflow and all controls available to you in Designer.
What Designer Does
Designer helps you build your web pages, landing pages, and eCommerce stores with drag-and-drop capabilities. You can substitute writing full-blown HTML, CSS, and JavaScript code with the Designer's functionalities because the Designer generates error-free and production-ready code in the background corresponding to your actions in the Canvas, your work area.
Supported browsers
Webflow unofficially supports Designer on all modern browsers, But the official support is limited to the latest, evergreen versions of Chrome and Safari. Webflow Designer isn't compatible to be used on IE, Edge, iOS Safari, and Chrome for Android.
However, certain browsers may offer limited support based on certain design features. For instance, CSS transitions will render properly on android mobiles only if they run Chrome version 108, released in December 2022.
Supported screen resolutions
Designer supports a minimum screen width of 1268px, which is the sum total of the left sidebar, Canvas, and right sidebar.
How to Access Designer Mode
There are three straightforward ways to access Designer-
- Click on your project thumbnail within the Dashboard.
- Click on Designer from Project Settings in the upper toolbar of the project.
- Choose Designer from the Menu button of the Editor.
Overview of Designer Anatomy
Designer consists of Canvas, where you can manipulate all CSS, HTML, and JavaScript components of your project. Besides, it consists of toolbars and panels that allow additional functionality and access. Here's a detailed breakdown of the Designer's anatomy.
The left toolbar and panels
- Main menu
When you click the logo, you can navigate to the Dashboard, Editor, or Project Settings of your current project.
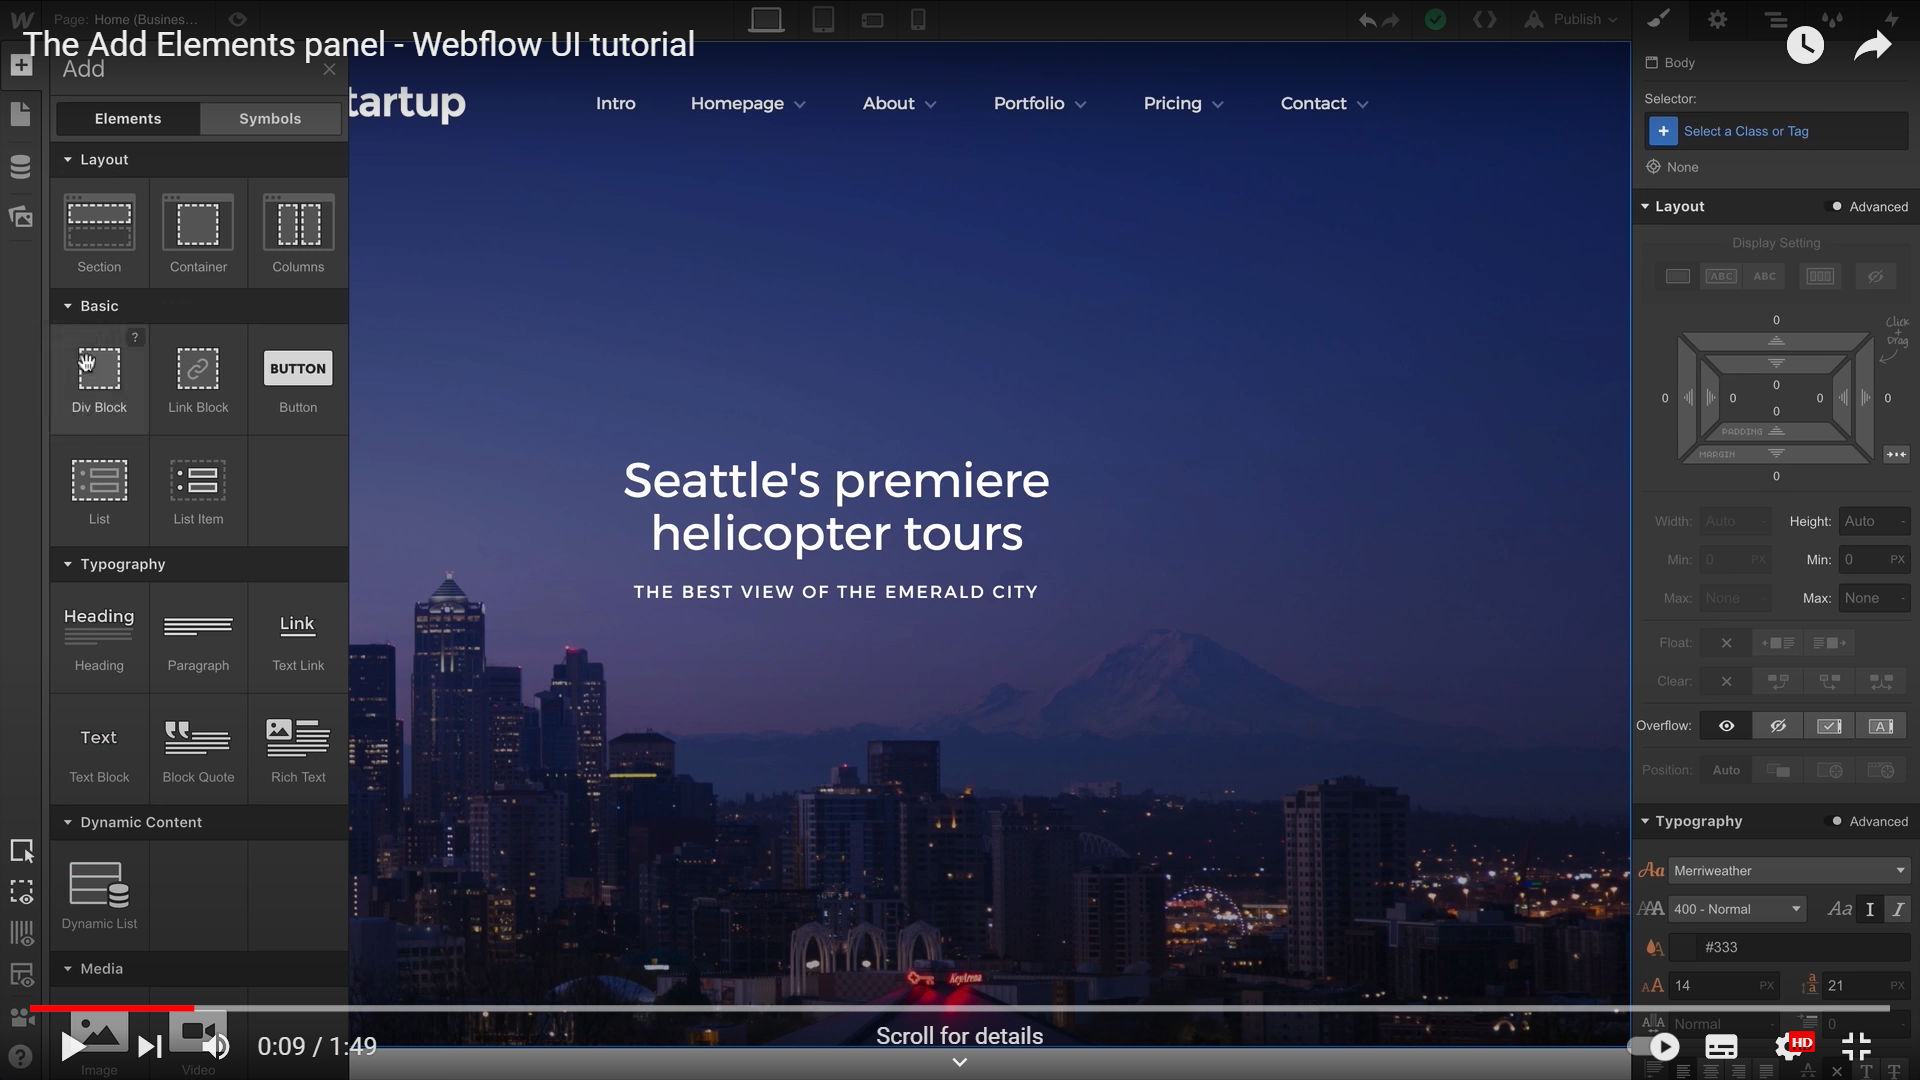
- Add elements panel
You can add all elements that you need to build your project, like typography, components, CMS, Media, and so on, from the panel.
For example, if you want to include a Form, you can access all possible form elements in the Elements Panel itself. You can use Form blocks, Labels, Input fields, Text areas, Checkboxes, Radio buttons, Form (Submit) buttons, etc., to create a form of your choice.
The element will be added relative to the selected element and default settings. But you can change the position by dragging it on the position you want to add your element.
- Symbols panel:
The symbols in Webflow have now evolved into Components. Components help reuse the predefined elements and their children for scalable and more efficient code.
Webflow users can create a component or make any element to be a component. Any recurring elements like nav bars, cards, or buttons can be created as components to be reused across the site. You simply need to drag the component and drop it onto the desired web page.
It's also possible to alter all the instances of a component if you edit any instances of the given component. However, if you need to override a certain component specifically, you can do it through Properties.
Webflow allows you to modify a component in 2 ways with the help of the categories - Visibility and Content Properties. Visibility controls whether the component instance is visible or hidden. While the Content Properties support -
- Text
- Image
- Video
- Link
- Rich Text
Finally, you can also unlink an instance from the component if you want to so that changes in linked instances don't reflect in the unlinked one.
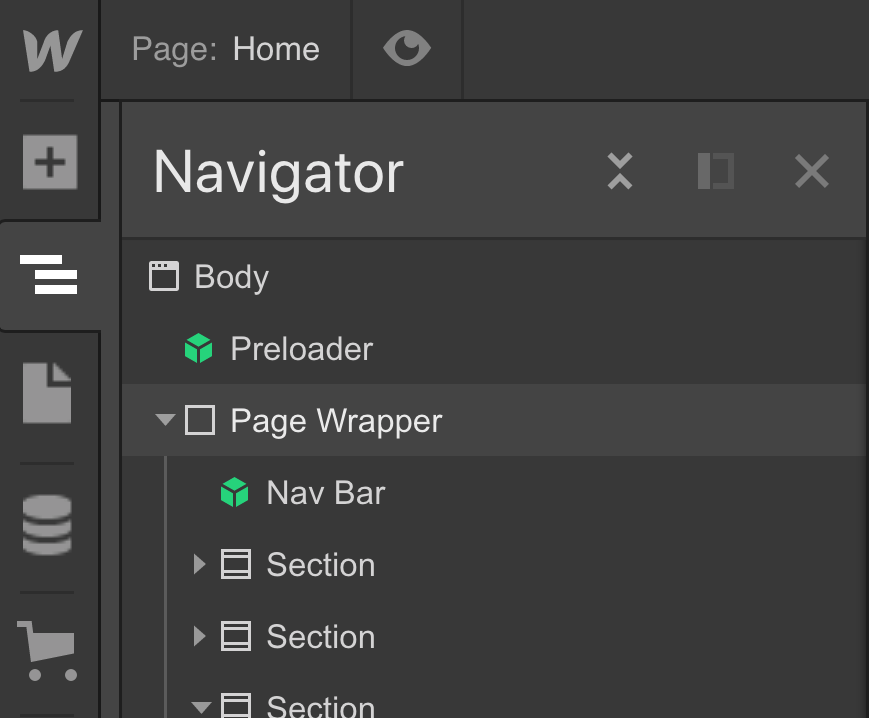
- Navigator panel
For easy access, you can pin and resize the Navigator Panel on screen sizes beyond 1440px. You can use Navigator to select visible and hidden elements on Canvas. Plus, you can also see the nested elements or hierarchy of a given page in the Navigation panel itself. It's also possible to move the elements and alter their hierarchy right from the Navigator
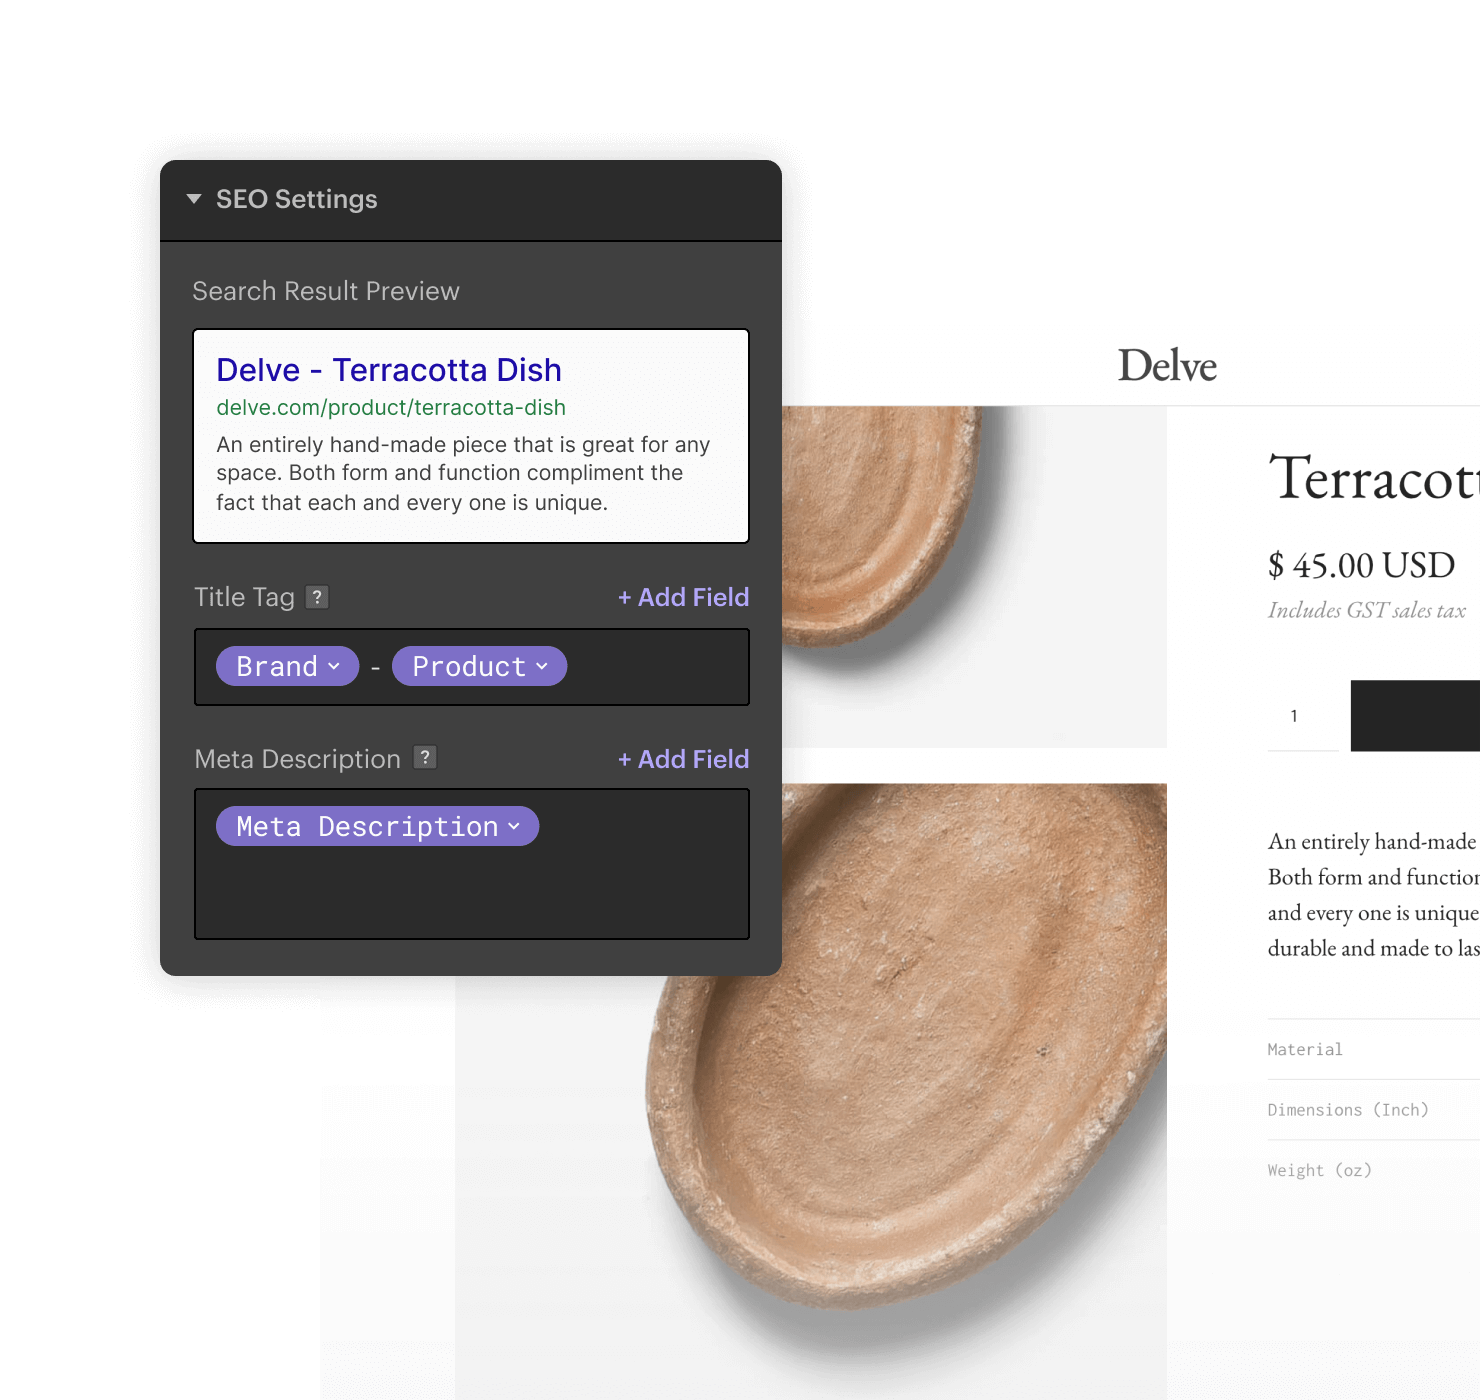
- Pages panel
Pages Panel allows the creation of new pages and folders on your website. You can create around 100 pages depending on your membership level. You can edit all Page Settings from the panel, like SEO settings, Open Graph settings, and Search settings, or add custom codes. You can duplicate, delete and even organize pages from this panel. However, organizing pages will likely change their URL paths, so be sure to set a 301 redirect as well.
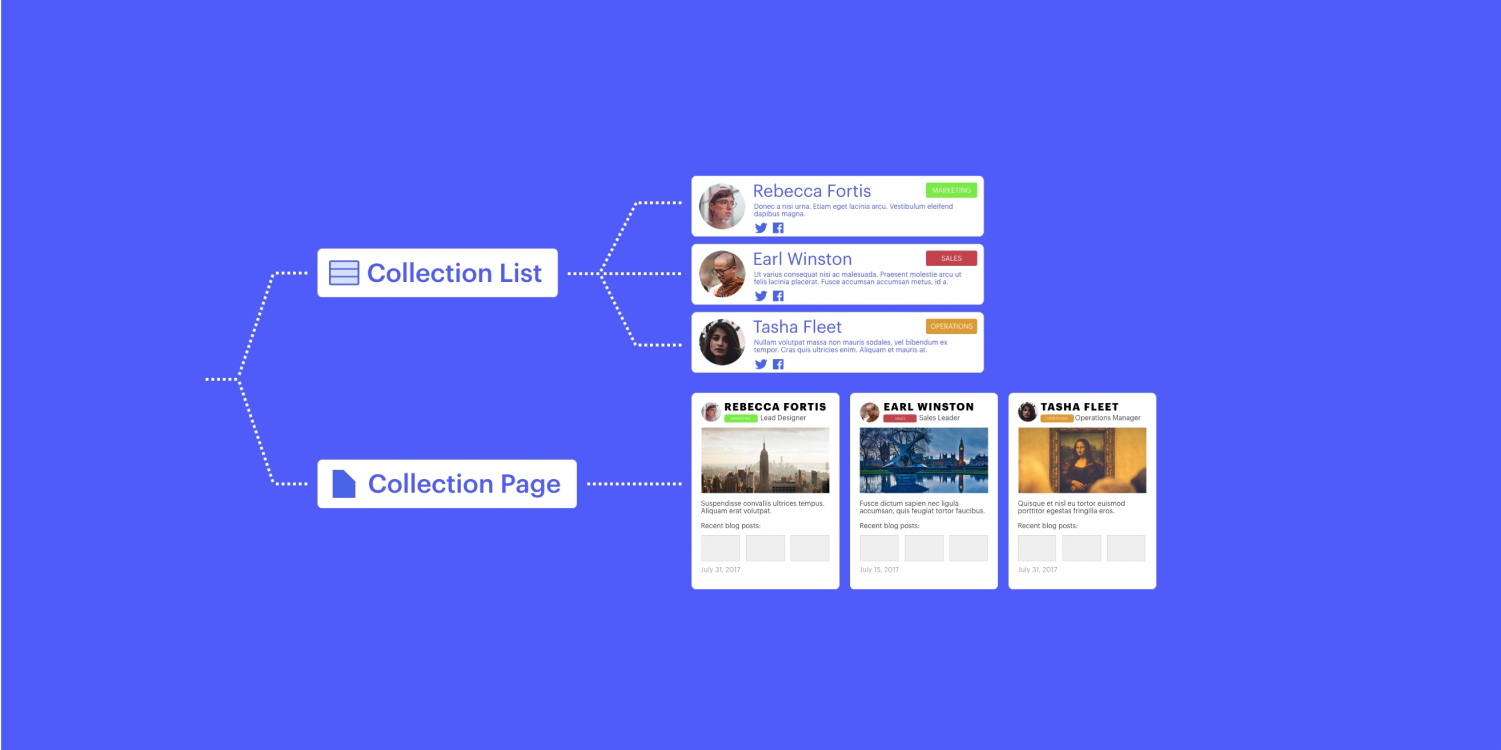
- CMS panel
Webflow's modern CMS allows dynamic content using containers called Collections. Collections contain items that are represented by fields. This field can be custom-created to contain any data you need.
You can build connections in 2 ways - Collection Pages and Collection Lists. You can add data one by one or import CSV for a bulk update. Your team can collaborate by editing content right from the Designer or even the Editor.
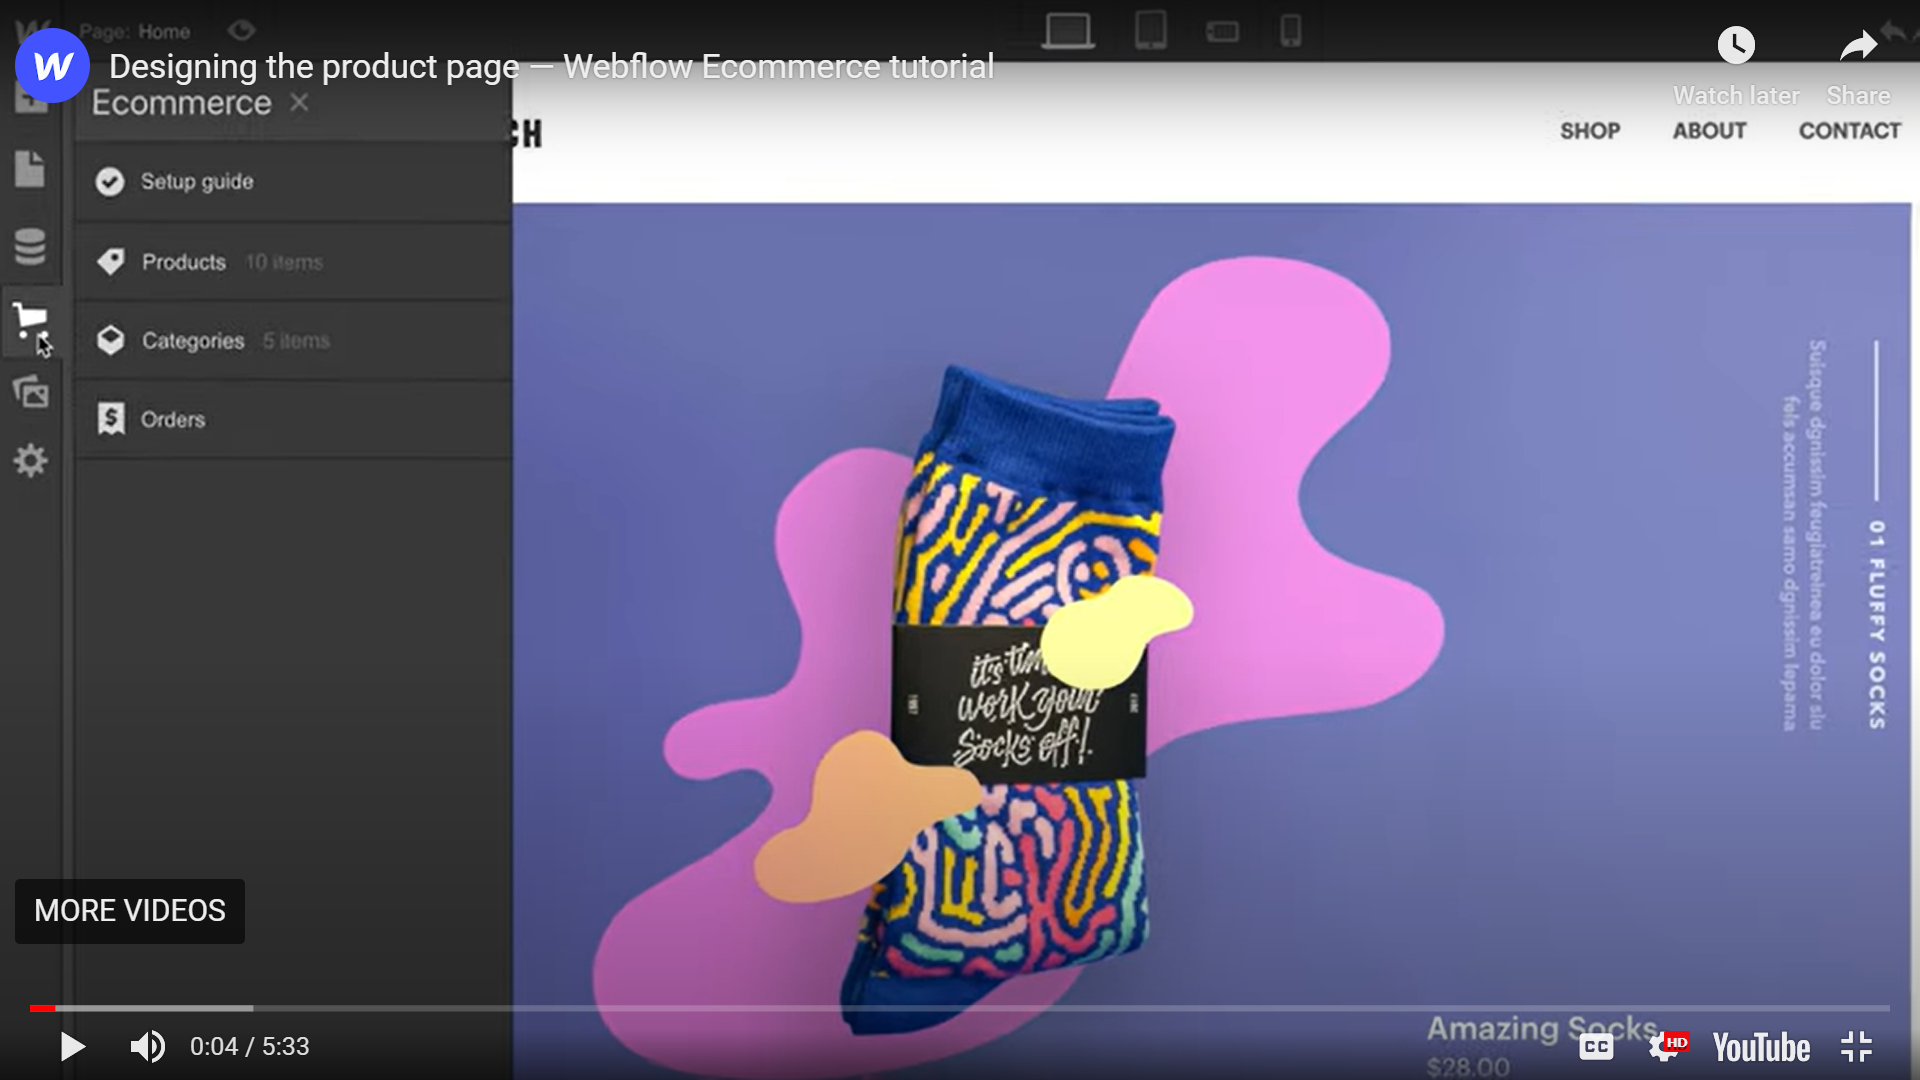
- Ecommerce panel
The eCommerce panel allows the creation of an eCommerce store by selecting a template or starting from scratch and enabling eCommerce. You can automatically access two dynamic collections, Product and Categories.
Now, you can either manually add the products or do it through integrations with Zapier or similar tools. Webflow offers great control over eCommerce stores by allowing users to create custom product fields and customized check-out pages etc.
The panel also facilitates the entire management of the online store, like creating ads, managing orders, setting primary currency, and so on.
- Assets panel
The assets Panel allows you to upload assets in the project and delete them. You can also sort assets and alter the view of the Asset panel. The assets can be any video, image, or Lottie files that you need on the page.
Webflow offers support for various image formats like JPG, PNG, WebP, etc. It also supports several documents like PDF, ODT, CSV, and so on. However, only JSON files are supported for Lottie integrations.
- Settings panel
Access various settings like Backup settings or Search settings.
- Audit panel
The Audit panel shows how your site can be more accessible before you hit Publish. It shows the missing Alt texts, non- Descriptive links, duplicate element IDs, or missing headings so that people using screen readers can interact with websites easily.
- Quick Find search tool
An inbuilt search tool in Webflow that allows you to search for anything to speed up your development.
- Video tutorials panel
If you're stuck and want to have a look at the video tutorial, they are available in the Video tutorials panel right away.
- Help settings
Again, all the help is available to you at all times. Help settings facilitate easy access to -
- Help and feedback: You can resolve your queries by looking in Webflow forums, Webflow University guides, and the video library. You can also send feedback to the Webflow team and ask for feedback.
- Keyboard shortcuts
You can speed up your work with keyboard shortcuts in Webflow. You can see all the shortcuts available to you by pressing Shift + /
- CSS preview
You can preview the CSS file generated by Webflow in this mode. You can also copy the code to use it elsewhere.
The canvas
Canvas is the center stage where all elements are accessed in the Designer. You can manipulate these elements on a granular level using Canvas.
- Selection
You can select any element on Canvas by selecting it by mouse. On the left of the element highlighted boundary, you will find the element label. On the top right, you will find the settings of the selected element by clicking on the gear icon.
- Hierarchy
You can see the hierarchy of the selected elements in multiple ways. One way to do so is by selecting the label on the top left to reveal the parents and grandparents of an element. Similarly, one can access the hierarchy by right-clicking on the element and seeing the hierarchy from the context menu. Another means to see hierarchy is through the Navigation breadcrumbs bar or by pressing the arrow Up on the keyboard.
- Movement
You can also move and reposition your elements around within the Canvas. Once you select it and move around, the blue indicator will show the siblings, and the orange one will show the parents. The position will depend on the display settings of the project.
- Preview
Preview mode allows you to see your web page as it was published on the web. If you enable preview mode, the rest of the Designer will be hidden. The only exception is the top Bar, but if you select the up arrow, it will go away too. However, you cannot modify anything on your page while in preview mode. You can press escape or click back the Preview icon.
The Top Bar
Top Bar provides multiple helpful tools for your use. They are listed below, starting from left to right.
- Page indicator
The page indicator shows which page you are in, for example, About us or Contact Us.
- Preview
A toggle button that helps you visualize exactly how your web page will look post-publishing.
- Breakpoint button
Webflow designs are responsive to all screen sizes because you can see how your designs adapt to each viewport. Breakpoint buttons allow you to switch screen sizes and see how designs respond and edit accordingly. The default view is the desktop view, and six other screen sizes are accessible as well.
- Undo and Redo
You can undo or redo your last action in the Designer.
- Save
Clicking on the Save button will NOT save your work, as it's automatically being saved. When in progress, the saving is shown with ellipses, and when done is shown by a green check mark. You can use Ctrl+S or CMD+S to manually save your work.
- Export code
You can export the code and save it as a zip file.
- Share
Share allows you to share a preview link with other team members and clients. But it allows your original work to remain intact in read-only mode. While if you want others to contribute, you need to invite them to collaborate.
- Publish
You can choose to publish your work to your domain or subdomain.
The bottom navigation breadcrumb bar
The bottom navigation bar follows the Breadcrumb principle, and it shows the hierarchy of your current/selected element path. It helps in SEO and easy navigation.
The right panels
The right panel facilitates fine-tuning of each element on the page so you can have greater control over how a single element on the page behaves.
- Style panel
It gives you the ability to stylize your elements by modifying CSS properties in the panel while the instant changes are reflected in Canvas.
- Element settings panel
Handy access to modifying the settings of the selected element.
- Style Manager
It shows the list of all classes and combo classes that you have created in the project. It also allows you to delete the ones, not in use.
- Interactions Panel
You can create and apply interactions to the selected element in this panel.
Multiple User Collaboration
Webflow allows multiple contributors to work in the Editor simultaneously. But the last edit can overwrite the preceding ones.
However, with recent developments announced at Webflow Conf 2022, even multiple designers can work simultaneously using Page Branching. This facilitates accelerated development and coordination.
Why Online Mode
The Webflow team chose Designer to be a hosted platform for streamlined and fast development. They believe this way, they can build and ship fast, and the same is true for users too. Online mode allows for active collaboration from all stakeholders.
The biggest advantage is WYSIWYG, or What You See is What You Get. So, whatever is visible on the Designer mimics what you will see after you publish on the browser.
Conclusion
The designer is at the core of the drag-and-drop feature of Webflow. Everything you need to build impeccable web solutions and eCommerce stores is available within the interface.
However, Webflow has unveiled new features lately. If you are looking for a credible team on all things Webflow, stay tuned with us for recent updates.
Webflow Conference was held during 9-10th of November, 2022 in Midway SF, San Francisco. Several hundreds attended the event live while thousands others joined online. The event was successful in building momentum around new updates and rallying in all Webflow communities.
From seasoned developers to newbies, all participated in several panels that celebrated the past year’s wins, recognized the active contributors, and learned about the latest upgrades.
The Significance of Webflow Conference
Webflow has an amazing and thriving community. The conference intended to strengthen the bonds within the community. Moreover, it also created a buzz to bring attention to recent developments around Webflow. Finally, it also led to awareness about Webflow’s role as a no-code development tool.
The Webflow Conf 2022 was an opportunity for tech junkies and no-code enthusiasts to gather to share their learnings, challenges, and more, in-person or otherwise. The Webflow team and clients showed up on stage to shared the latest developments across 4 directions - Grow, Build, Design, and Collaborate into Webflow’s universe.
The 4 Superpowers: What are they?
Webflow has unveiled new and exciting features aka Superpowers that can revolutionize the way you look at web development. These superpowers are aimed at different aspects of web development that serve different use cases. This blog covers Developer superpowers that have been already rolled out and the ones that are due.
Developer Superpower Explained
Developers are at the core of the Webflow community. Therefore, Webflow has released several new features that allow developers to work effectively. These superpowers come under four categories pertaining to user interface, data, Ecommerce, and automation. Let's have a look at each one of the following:
UI:
Usability is a primary requirement of modern apps and websites. But, ensuring consistency across design systems or providing unique instances while scaling the site or app has been challenging. Hence, Webflow earlier announced Symbol overrides and nested Symbols, which tackled the challenge partially.
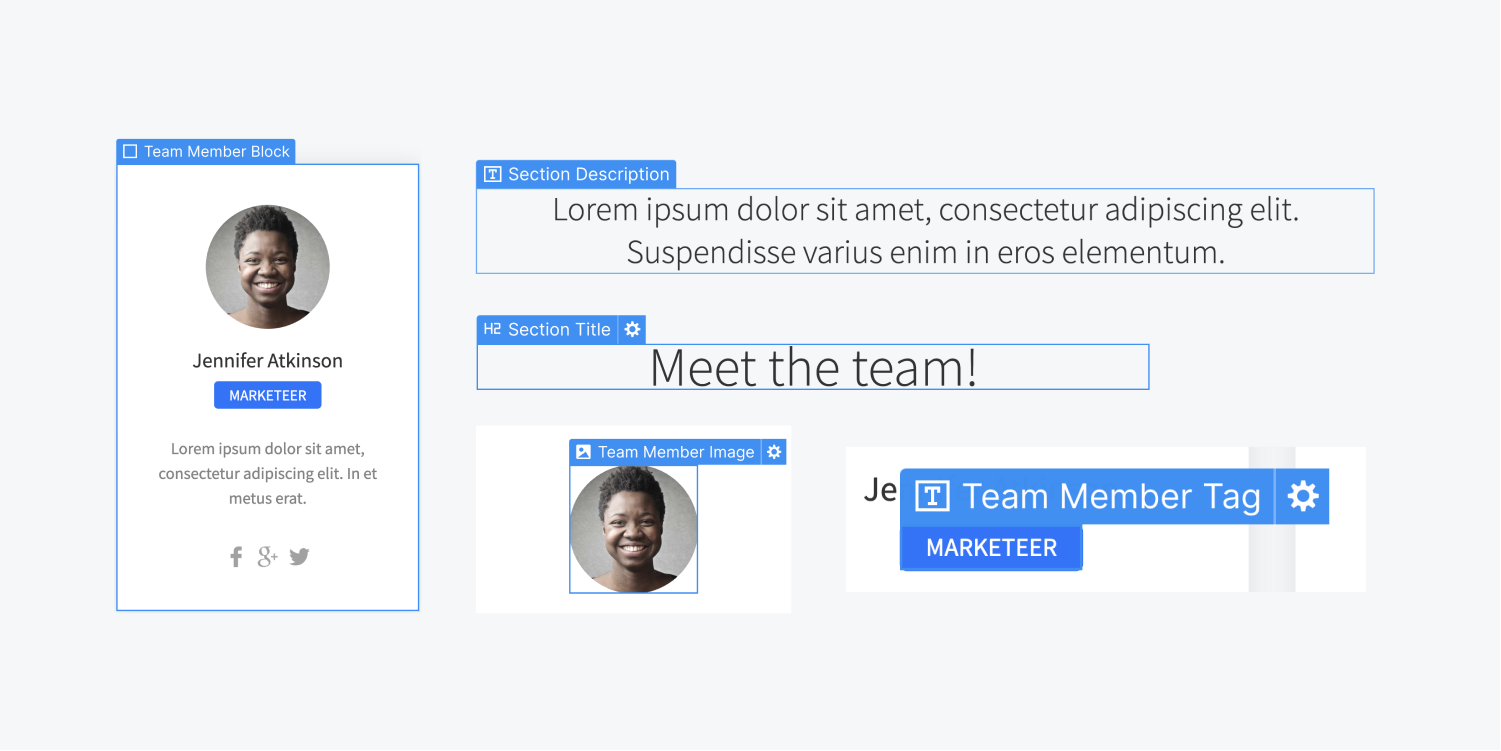
But, the latest upgrade of Symbols to Components has taken this to the next level. Components allow reuse of UI elements. You can edit layout components within the canvas itself. Additionally, it's also possible to define specific properties of each instance that are preserved or modified. For example, altering the headshot and content for each testimonial card of your website while maintaining the structure of the card itself.
Another noteworthy release was variable fonts. Now, coders and designers can change the weight and style that was fixed as per preset parameters given by the type designer. It will be possible to alter these font properties on a more granular scale with a slider than putting in pre-determined numerical values in upcoming versions. More so, these Open Font variations will now load using a single file, instead of loading multiple font files.
More so, it will be possible to add Support states, transitions, interactions, for fonts too, based on mouse hover, and so forth.

Data:
Webflow allows users to make bulk updates using CMS collections. Collections can refer to different content types, for instance, product categories in an Ecommerce store. Now, updating this kind of dynamic content is tedious.
But, with Webflow you can import CSV files to update dynamic content on any collections, including ecommerce stores, blogs, portfolio websites, etc. Moreover, publishing bulk data will also be achievable with Webflow. You can also link components to dynamic data in Collections pages. Collection pages act as templates, so editing one will propagate changes in all other instances.
Going forward, Webflow will also provide native support for localization aka multiple-language sites. This was made possible by expanding on the number of CMS Collections, which allows to host more data on a website. The next shipping of this feature will help localize both static and dynamic content.
You can localize items like images, page settings, SEO titles, etc. Developers can also code localization APIs using external translation services. Localization is highly useful for businesses looking to widen their reach and expand their revenue.
Webflow is the top-rated no-code tool to build Membership sites. Now, with Webflow you can design customized user experience for Membership sites. ‘Users’ is accessible in the UI with Webflow Designer for easy access. You can allow or prohibit access to a certain content based on user status, say their login status or even their subscription tier into a membership portal.
This empowers creators to monetize their content within different strata of community. Furthermore, Membership sites can have up to 20,000 users instead of a previous bar of 300.
Ecommerce:
Ecommerce is one direction where Webflow is seeing significant growth. Around 5.4 million products have been sold using Webflow Ecommerce so far. Hence, Webflow Conf 2022 announced exciting features for Ecommerce businesses too.
The number of products supported increased in both Ecommerce Plus (from 1000 to 5000) and Ecommerce Advanced (3000 to 15000). Additionally, the item limits for ecommerce items and CMS items will be calculated separately in contrast to the earlier coupled counting.
Logic:
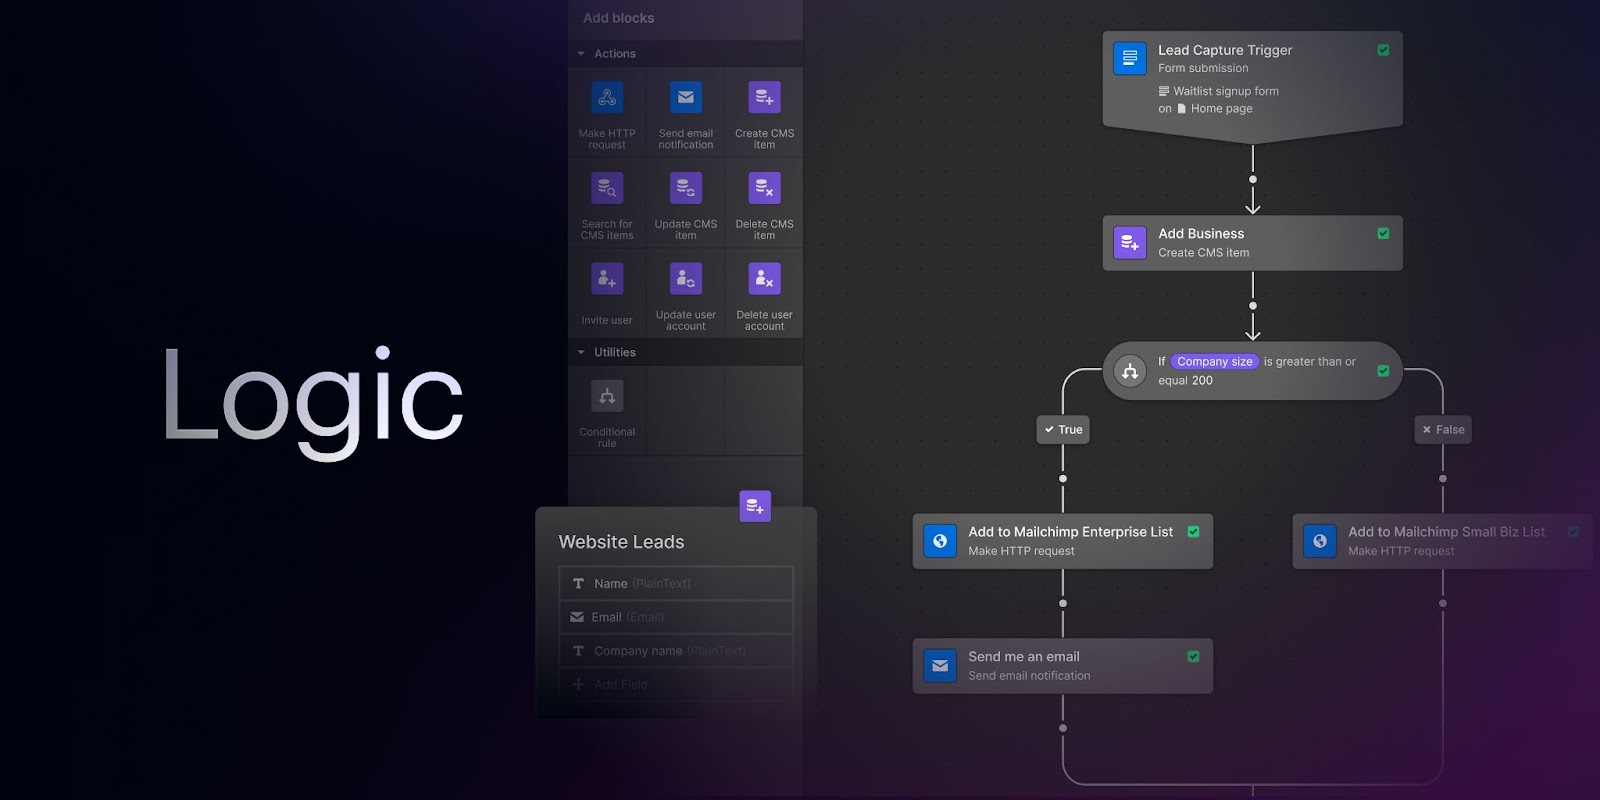
Webflow Conf highlighted how brands are using Logic to power their web solutions. Logic allows for native automation in Webflow websites and apps. This provision is absent in several other website builders calling for complex coding routines. Logic has been under development for several months now and is in Beta mode and available to anyone who signs up. Logic comprises Trigger, Condition, and Action.
Logic enables to set a resultant action in motion when a set of preset conditions are fulfilled. Logic empowers developers to build automations seamlessly using different Webflow capabilities like forms, CMS, Users, and so on.
Why must developers care?
No-code adoption is on the rise. Developers must leverage these existing building blocks to spearhead their development processes. No-code development is the neat and efficient way of coding modern apps, websites, and ecommerce stores.
Technology is a landscape that changes each day, and it only makes sense to be an early-adopter of a technology on the rise, which also makes your job easier and faster.
Conclusion
Webflow will ship a lot of updates in the coming months. We want our readers to be the first to get the dips as soon as possible. So, you can continue to check this space for incoming updates. Till then, happy coding folks!!

Webflow Conference 2022 shared new releases that can make collaboration between an internal team and third-party service providers extremely easy. They have called these Collaboration Superpowers. But the question arises was such a superpower really needed? Let's answer this question by understanding a typical development case first.
What does Web development look like today?
Web development in a traditional environment keeps the information siloed, especially in cross-functional setups. Sometimes, even the internal teams of development agencies fail to collaborate on the same web development project effectively.
For instance, let's take an example of an ABC agency that's developing a state-of-the-art web solution but with a tight deadline to produce the initial design mock-ups. The agency ends up employing two different teams to come up with parallel layout solutions to beat the deadline. Then it picks a more optimal one based on client approval. But, this proves to be a resource-intensive exercise with less than stellar results.
Continuing with the above example, after choosing the preferred design, the developer team takes the charge. Now, they have issues interpreting and translating the design elements seamlessly in the development environment, and certain design elements can present technical challenges.
After resolving the designer-developer conflict, they finalized the website design and functionality. But now, the website is ready for another round of revision because it needs to cater to the branding and marketing needs of the organization.
Why is collaboration a challenge?
As stated in the previous example, several stages of traditional web development suffer from a lack of proper collaboration. The entire web development cycle can benefit from the collaboration and parallel functioning of all contributors to the project.
Developing responsive web solutions to cater to different screen sizes that also deliver excellent user experience is tough. Throw in the technical feasibility and business requirements in the equation, and you'll quickly appreciate how web solutions suffer from siloed processes.
We need:
- External stakeholders and team communication.
- Internal team communication.
- Cross-functional team communication, say with marketers.
The good news is Webflow takes care of all this because it's an inherently collaborative environment. It allows different designers, developers, and marketers to work coherently and integrate the changes to deliver faster work with minimal resources wasted. This is one of the top reasons you should use Webflow.
Collaboration Superpowers Explained
The Webflow Conf 2022 announced the following Collaboration Superpowers.
1. Guest Role
Collaboration superpower allows dedicated Webflow professionals to have a smooth journey with their clients. Clients can hire a freelancer or an agency to edit or create Webflow designs via Guest Role. But first, both the guest and client need to have a workspace account. A workspace is a shared working space for individuals or teams. The guests must have either a Freelancer or Agency workspace to take advantage of this provision. Alternatively, they could be a member or admin of either of these accounts.
The guest role helps freelancers or development agencies to take care of changes without sharing confidential credentials or transferring sites back and forth. The guest can make changes to designs, site settings, etc., behind the scenes. At the same time, the ownership of the site is secure with the client. Another core benefit of the Guest role for businesses is that guests are not counted towards the seat count of their workspace plan.
The guest has the following abilities - Create the site, clone the site, accept a transfer of ownership, and buy templates from Marketplace. They have access to -
- All Sites and Folder
- Editor
- Integration Workspace settings
- Templates Workspace settings
However, The Guest role doesn't have access to any confidential workspace settings -
- Members
- Plans
- Billing
- Partner Settings
The permissions of the guests can vary with the Workspace plan of the client. Suppose, for example, Enterprise plan holders can modify the roles and permissions of the guests.

2. Access Control
Webflow workspaces allow setting roles and permissions at two levels
- Workspace level
- Site-level
The site-specific access has been recently rolled out by Webflow.
Workspace Level:
Users with all levels of paid plans become the default owner of their workspace. They can invite members to become a part of their workspace. Owners can assign different levels of access, depending on the assigned roles to the team members. These roles include admin and member.
The permissions for each role vary and can be summarized below:
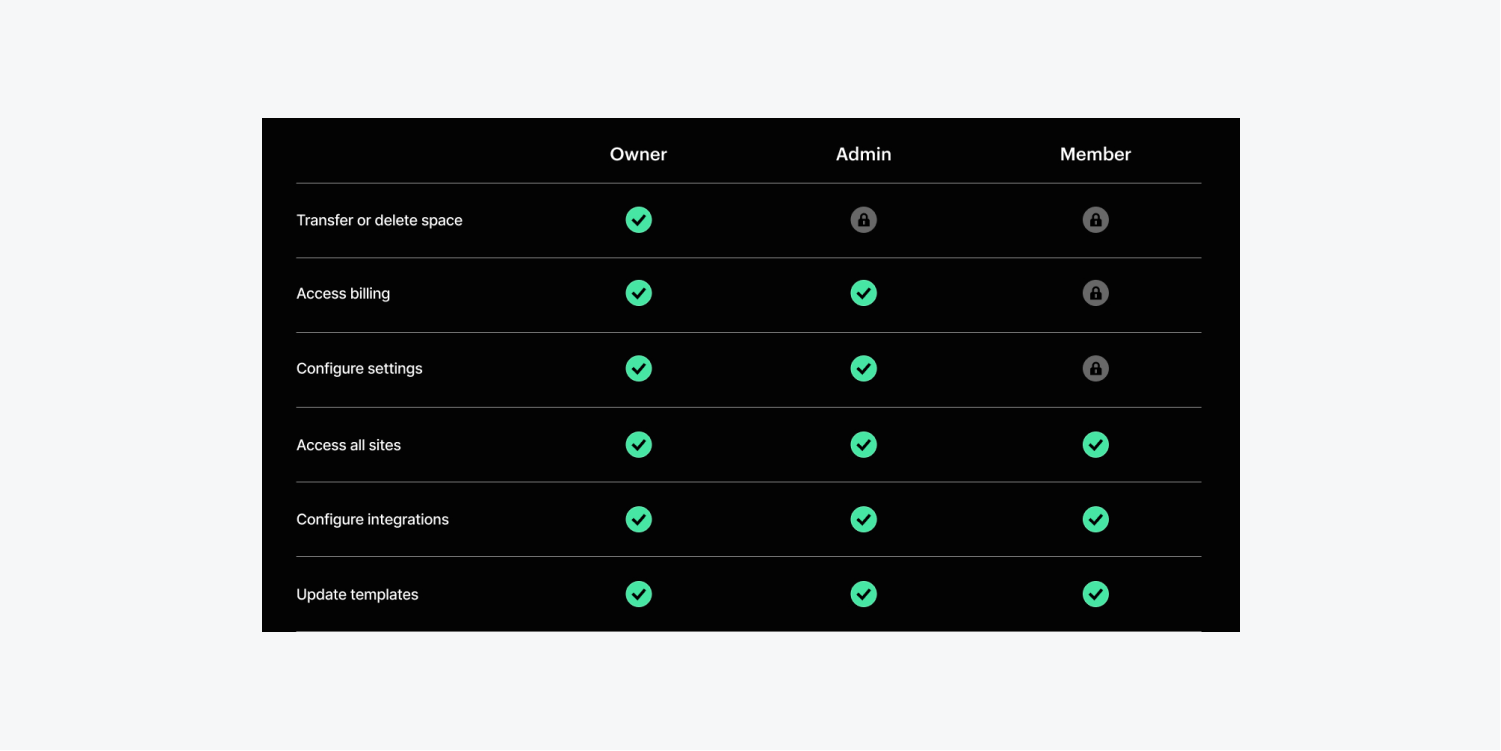
Site-level
Webflow allows site-specific access to team members as site admins or members with varied permissions. However, site-level permissions are available to Growth, Agency, and Enterprise plans only.
Owners of workspaces are the default site admins for all the sites within a workspace. However, they can make other users the admin for a given site.
The other permission levels for Site-level access are 'Can design and publish,' 'Can design,' and 'Can design (limited). Again, the 'Can design' role is limited to Enterprise plans in the customer and partner category.
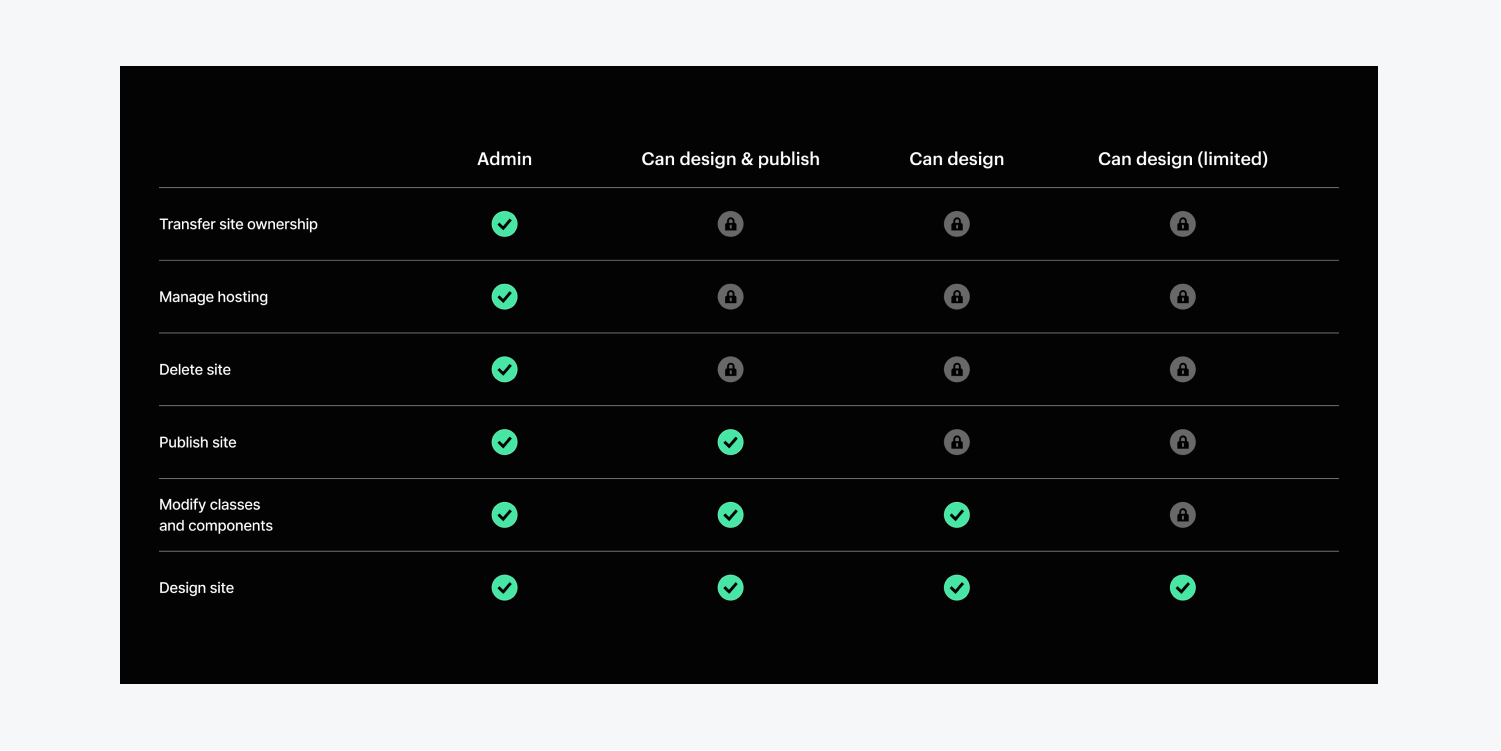
Additionally, Workspace owners can also invite content editors for Ecommerce, Business, or CMS plans. These editors can add/edit content and page settings in the CMS.
3. Page Branching
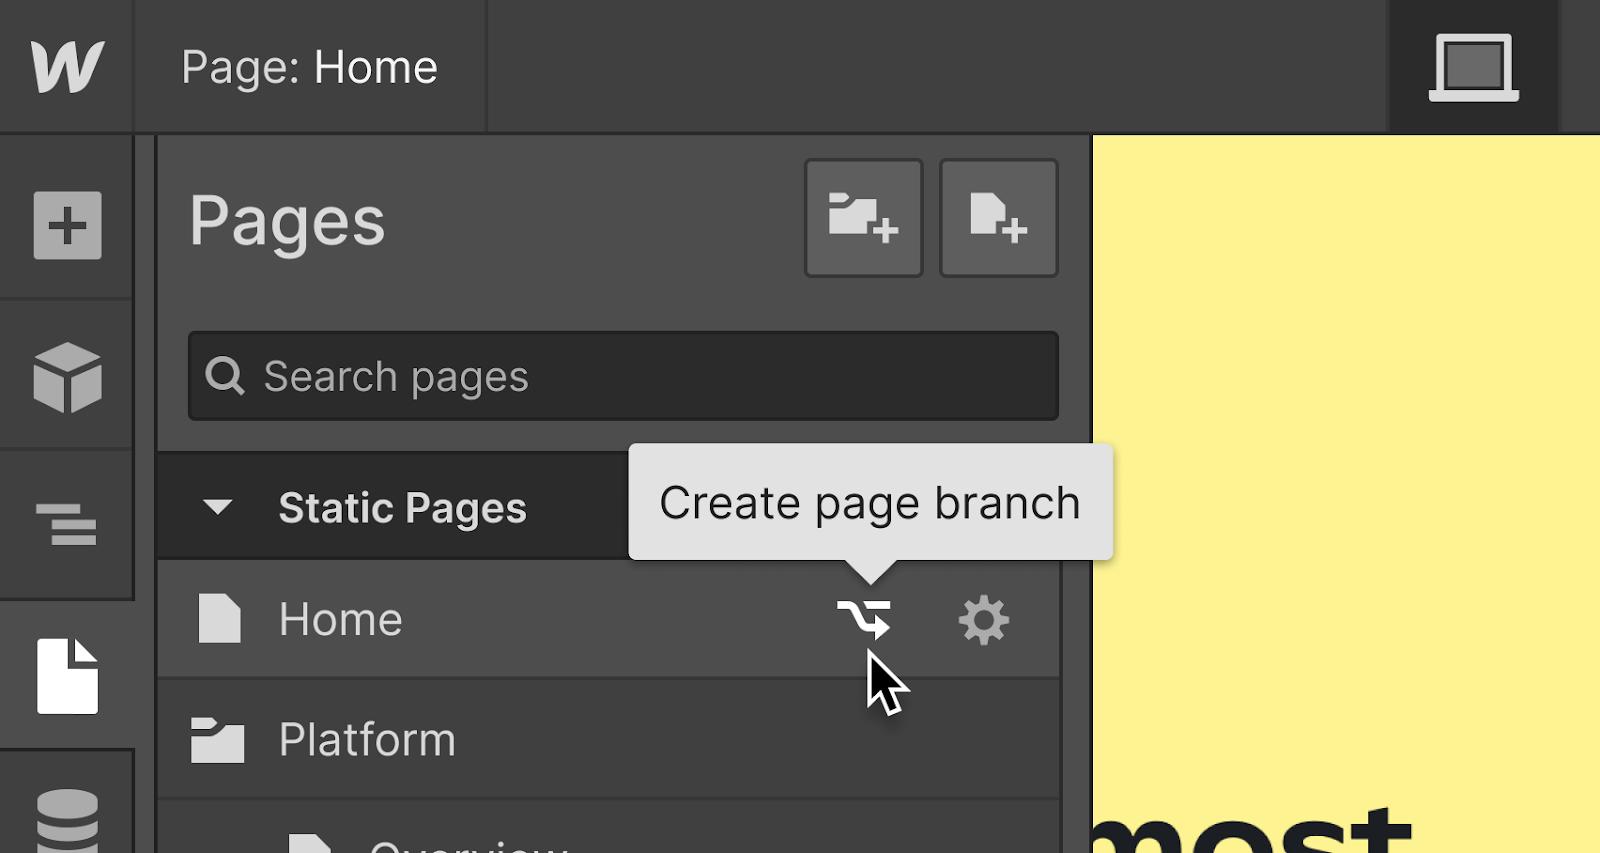
Page Branching is a recent update made available to Enterprise customers and Enterprise partners. It allows multiple designers to work simultaneously on different layouts or content and merge changes once done.
Page Branching creates a temporary instance of a site page that has been branched like a snapshot. The modifications on the snapshot don't reflect on the main pages, giving designers a safe space to explore new designs without affecting the rest of the site. Designers can branch the following site pages -
- Static pages like Utility pages, Ecommerce pages, etc.
- Drafted Pages like internal style guides or archived content
- Dynamic Pages like Ecommerce Page
However, despite the fact Page Branching allows teams to work in tandem on several fronts. It has certain limitations as well -
- Only one Page branch per site page
- Only one designer can work on a particular page branch
For all page branches, the new workflow looks like this:
- Branch
- Build
- Update
- Merge
- Publish
{{blog-cta}}
Benefits of Collaboration Superpowers
Collaboration Superpower can provide benefits to all parties involved.
For agencies:
- Agencies can invite guests without adding a new seat to their plan.
- Access control at the site level allows greater and more efficient control of how teams work.
- Page Branching allows for faster shipping.
For freelancers:
- Freelancers can work without tedious ownership transfers.
- It's possible to have guest access to multiple workspaces, making client collaboration easy.
For site-owners:
- Site-level access roles allow finer control of how team members work.
- Site owners can use time and talent resources efficiently because of Page-Branching.
- Site owners can outsource effectively and securely, thanks to Guest roles.
Conclusion
Webflow has created a more collaborative environment that will bring in improved and effective workflows across teams. The ability to grant site-specific access or page branching gives an edge to Webflow users unavailable to other users. Moreover, Collaboration Superpowers are beneficial for all entities of the Webflow environment, i.e., agencies, freelancers, and Enterprises as well. And it makes collaboration among each of these entities smooth and optimized.
Hope this blog helped you understand the recent releases in Webflow.

Webflow Intro:
Webflow is a modern web development solution suited to building no-code web solutions without spending weeks on development or debugging. Instead, you can rely on the powerful tool to generate clean and efficient code that maps to your drag-and-drop actions.
Do you recall the difference you experience while using command mode instead of GUI mode? Well, that's the exact feeling that Webflow can provide.
It's a potent interface to build web solutions minus any efforts to remember and type the syntax or maintain pesky indentations. Did we mention - bugs will never bug you? (pun intended)
Webflow empowers developers and designers to ship their ideas quickly yet efficiently. You might be wondering how you can attain that with Webflow.
Why use Webflow:
Read to know the top 10 reasons you must use Webflow and the direct benefit you derive when you use Webflow.
Drag-and-drop builder
The visual website builder allows you to create a super interactive customer experience. Instill life into your websites with Parallax animations. You need not recreate animation by hand with Webflow.
Thanks to Lottie integration, your animations will render smoothly, irrespective of device resolution. But you don't need any external plugins to integrate Lottie, unlike those used in Figma or Adobe After Effects. Everything is at your fingertips without writing complex, long-winding code.
Benefit: Suppose you're a beginner developer. Webflow is an excellent tool to lend a concrete structure to your ideas without any need to get into complicated details. On the other hand, if you're an experienced coder, you'll quickly graduate to a somewhat similar coding environment of seeing the visual editor beside the code. However, you will appreciate the increased speed and efficiency of auto-generated code.
Robust CMS
Webflow CMS is straightforward to use. Content-first designs help include rich and dynamic content without cramming content into pre-defined structures. You or your content editors can directly edit from the page instead of logging into a dashboard, thanks to REST API. You can add content manually, import it with CSV, or use the API.
Suppose you're handling a migration for your client. Webflow makes it easy to connect to an external CMS. Importing and exporting content is a breeze as well. You can also create webhooks to tackle routine trigger events like form submissions.
Benefit: The content and design integrate seamlessly, resulting in an efficient and pleasant user experience for the end-user. Plus, you can check off time-consuming but unavoidable maintenance tasks like exporting content to third-party applications using Webflow.
Powerful Hosting
Webflow relies on AWS for hosting, which lends innovative features like elastic load balancing and auto-scaling so your application can dynamically scale in response to changing requirements. Hence, it's easy to scale with Webflow's powerful hosting.
The self-hosted websites in Webflow can handle heavy traffic thanks to data centers across the globe. Webflow takes advantage of the capable CDN, Fastly, to reduce page load speed and response time of web applications. No matter how intensive the content you host on websites, they will load fast and seamlessly.
Benefit: Building self-hosted web applications in Webflow relieves you of Server downtimes. Latency will not be an issue, regardless of traffic or load.
Outstanding Membership sites
Membership sites are in vogue these days because of the rise of the creator economy. As a result, it's easy to create membership sites that allow customizable access to different use cases.
You don't need to worry about server-side rendering or connecting external stack for the same.
This means you can help your clients build a subscription-based business or offer online courses within Webflow. In addition, Webflow allows you to create tailored experiences for different categories in case of a tiered subscription.
Developers can also test certain under-development parts of the site discreetly before unveiling it to the world.
Benefit: Create an exclusive experience for different use cases and get complete control of how website visitors access the website or consume web content. You can even build a member portal with Webflow for end-users to create an account and use it from a centralized dashboard.
Ecommerce-friendly
With Webflow, you can easily create scalable stores for your clients. Create unique store layouts that blend with brand ethos using a potent visual builder. You can easily alter the Home page or Gallery for your e-commerce store. Plus, you can customize the purchase flows and product fields to better serve your industry-specific needs. If you dislike the Liquid Templating system of Shopify, give Webflow a try.
Power your online store with custom interactions and multi-step animations. These help you to deliver a memorable user experience to the end-user. In addition, dynamic CMS allows for better selling methods through content instead of the linked content in regular blogs.
Benefit: The foremost benefit is spectacular and scalable eCommerce stores that will help your client stand out.
Exceptional Security Features
Webflow adheres to ISO 27001 for information security, confidentiality, and availability. Plus, it follows the guidelines laid down by CIS Critical Security Controls. Plus, Webflow complies with CCPA and GDPR guidelines, ensuring stringent data protection for website visitors.
For payments, Webflow relies on Stripe, a level-1 service provider.
Benefit: Protect your web solutions from potential cyber threats. Protect your clients from data leaks or data theft.
Easy Automation
Many websites rely on automation to handle routine website actions by website visitors, including automated logins or form submissions. But, this automation often calls for integrations from third-party solutions.
Webflow allows you to automate your website without third-party automation tools using Logic. Instead, it's possible to build blocks in Webflow's Flow Editor using drag-and-drop. You can define different workflows based on different triggers. You can link various aspects like databases, emails, or other external stacks with minimal code.
Benefit: No need to use third-party integrations for automation when working with Webflow. Troubleshooting the visual workflows is a breeze, and you don't need extensive coding capabilities to build automation into your websites.
{{blog-cta}}
Excellent Support
The Webflow community grows by leaps and bounds and stands at 75000+ remote members. This number will rise as more people experience the power of no-code tools. In addition, Webflow offers Webflow University and Webflow TV to answer your common questions and help you get started with website development.
Plus, phone support and live chat options are available, so you don't get stuck. You can also get extensive support from Webflow if you are on their enterprise plan.
Benefit: Get help whenever you need it with several options available. Most importantly, all information is presented lucidly, and interestingly so even novice users can quickly calibrate themselves.
Speedy Development and Launch
The development time cuts down significantly when you use Webflow, as the design and development take place simultaneously. Plus, as the code is auto-generated, the resultant code is free of errors or bugs. Therefore, debugging and testing time is also reduced to a great extent. This allows for the speedy launch of your business website.
Benefit: Have greater control of your time and channel that time into developing innovative solutions or taking up new challenges.
No Complicated Backend to Manage
Other competitors need users to login into the backend and edit content or web layout. Plus, you never have nasty backend issues like SQL injections, load balancing, or such. You will not have to carry out extensive tests at each level or worry about the risks of cyber threats on your website.
Benefit: You don't have to channel your efforts into building a robust backend. You have one less thing to worry about with Webflow. Plus, website maintenance is a breeze.
Concluding Remarks:
We have covered the reasons why you must use Webflow. Webflow can speed up your web development without sacrificing functionality or aesthetics.
Our parting words - It's a leading no-code development tool, and now is the right time to try your hands on Webflow. Have a look at what we have been doing for our clients here.
WordPress is an open-source web builder platform that offers themes and plugins for advanced functionalities. WordPress made its debut in 2003, and it continues to beat its alternatives like Blogger and Medium to be a preferred alternative as a blogging platform.
Thanks to its rich library of plugins, it also offers other web solutions like eCommerce stores and business websites. The software is free to use. But, one has to pay for hosting and domain to use a WordPress site.
In contrast, Webflow is a complete SaaS application that provides hosting solutions and advanced web development capabilities. Webflow began its journey in 2013 when co-founders Bryant Chou, Vlad Magdalin, and Sergei Magdalin came up with the idea of no-code website building.
Soon enough, Webflow emerged as an intelligent solution to create robust and responsive web solutions. Though other no-code solutions are available, that's a story for another day.
Today, let's dive into the must-read differences between Webflow and WordPress.
Comparison
At a Glance:
This is a quick comparison between Webflow and WordPress
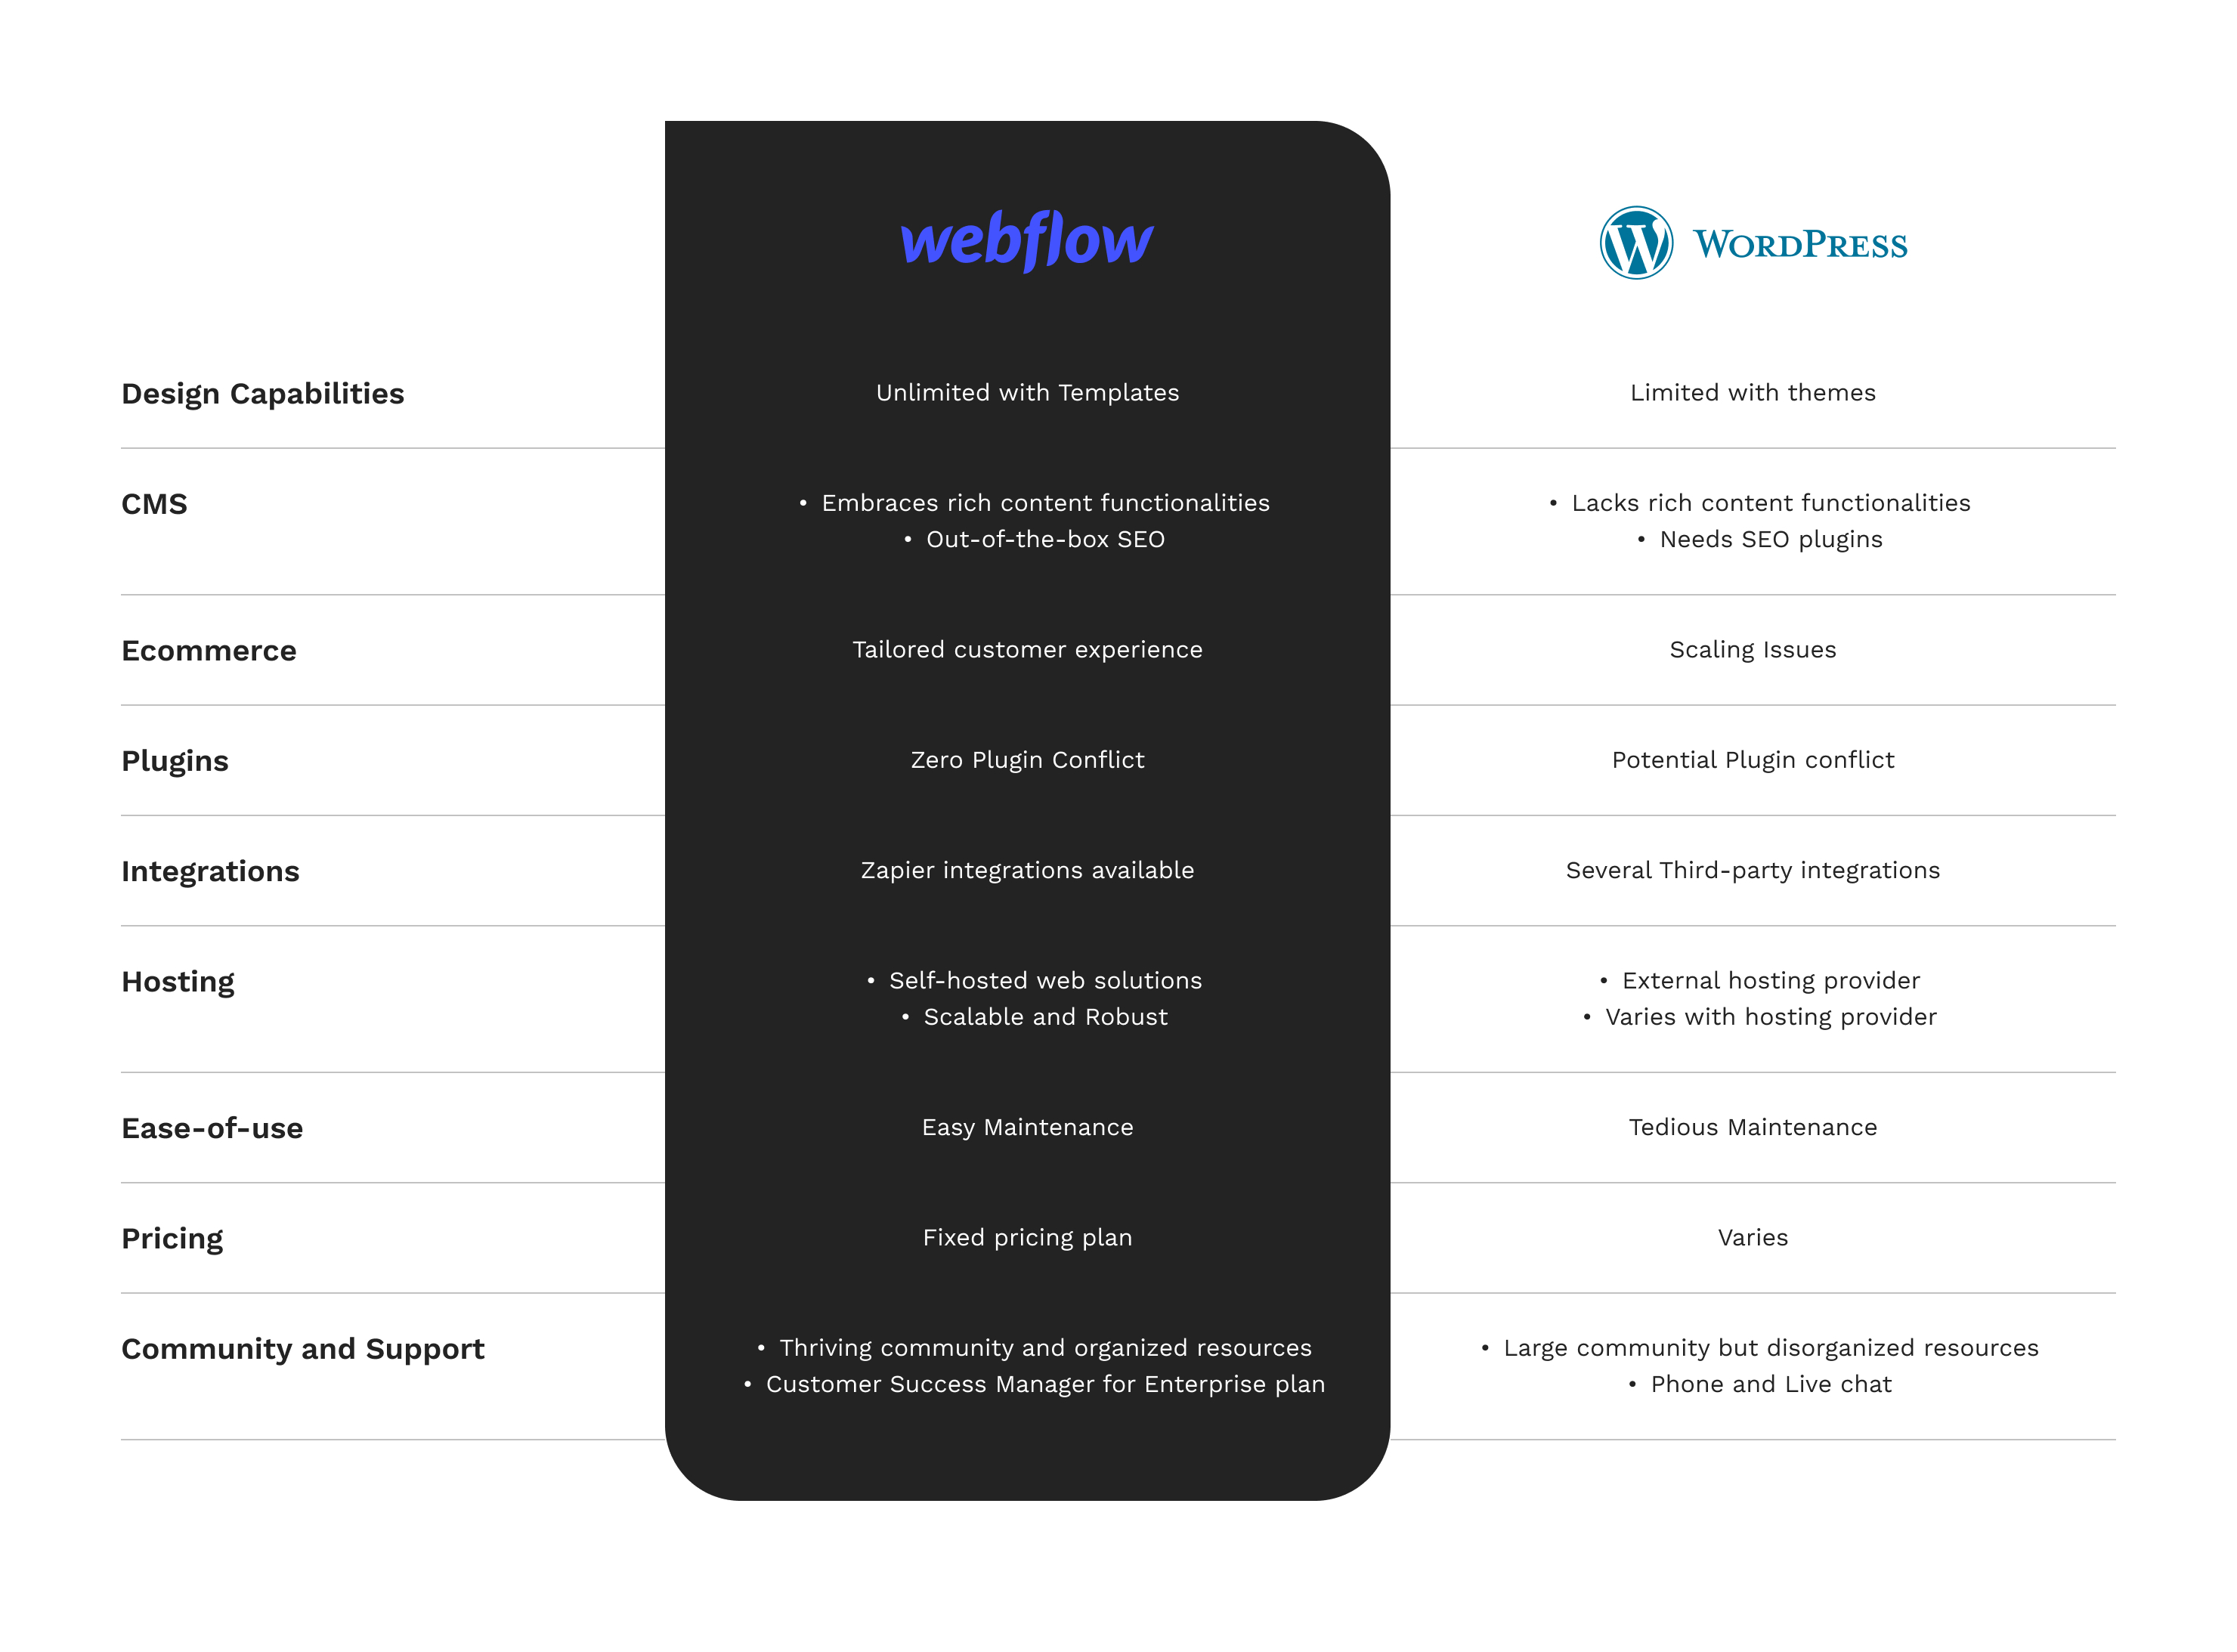
Design Capabilities
WordPress
WordPress offers several paid or free themes for website layout. You have three design routes when using WordPress.
- DIY website: You will require intermediate coding knowledge to create a website using WordPress plugins and page builders.
- Template Website: Using a template is like plug-and-play. But, the limiting factor is that you can only edit the existing themes if you know the coding.
- Custom Website: Expert-level coding knowledge is required where you don't use existing templates but hand-code all design and functionality aspects.
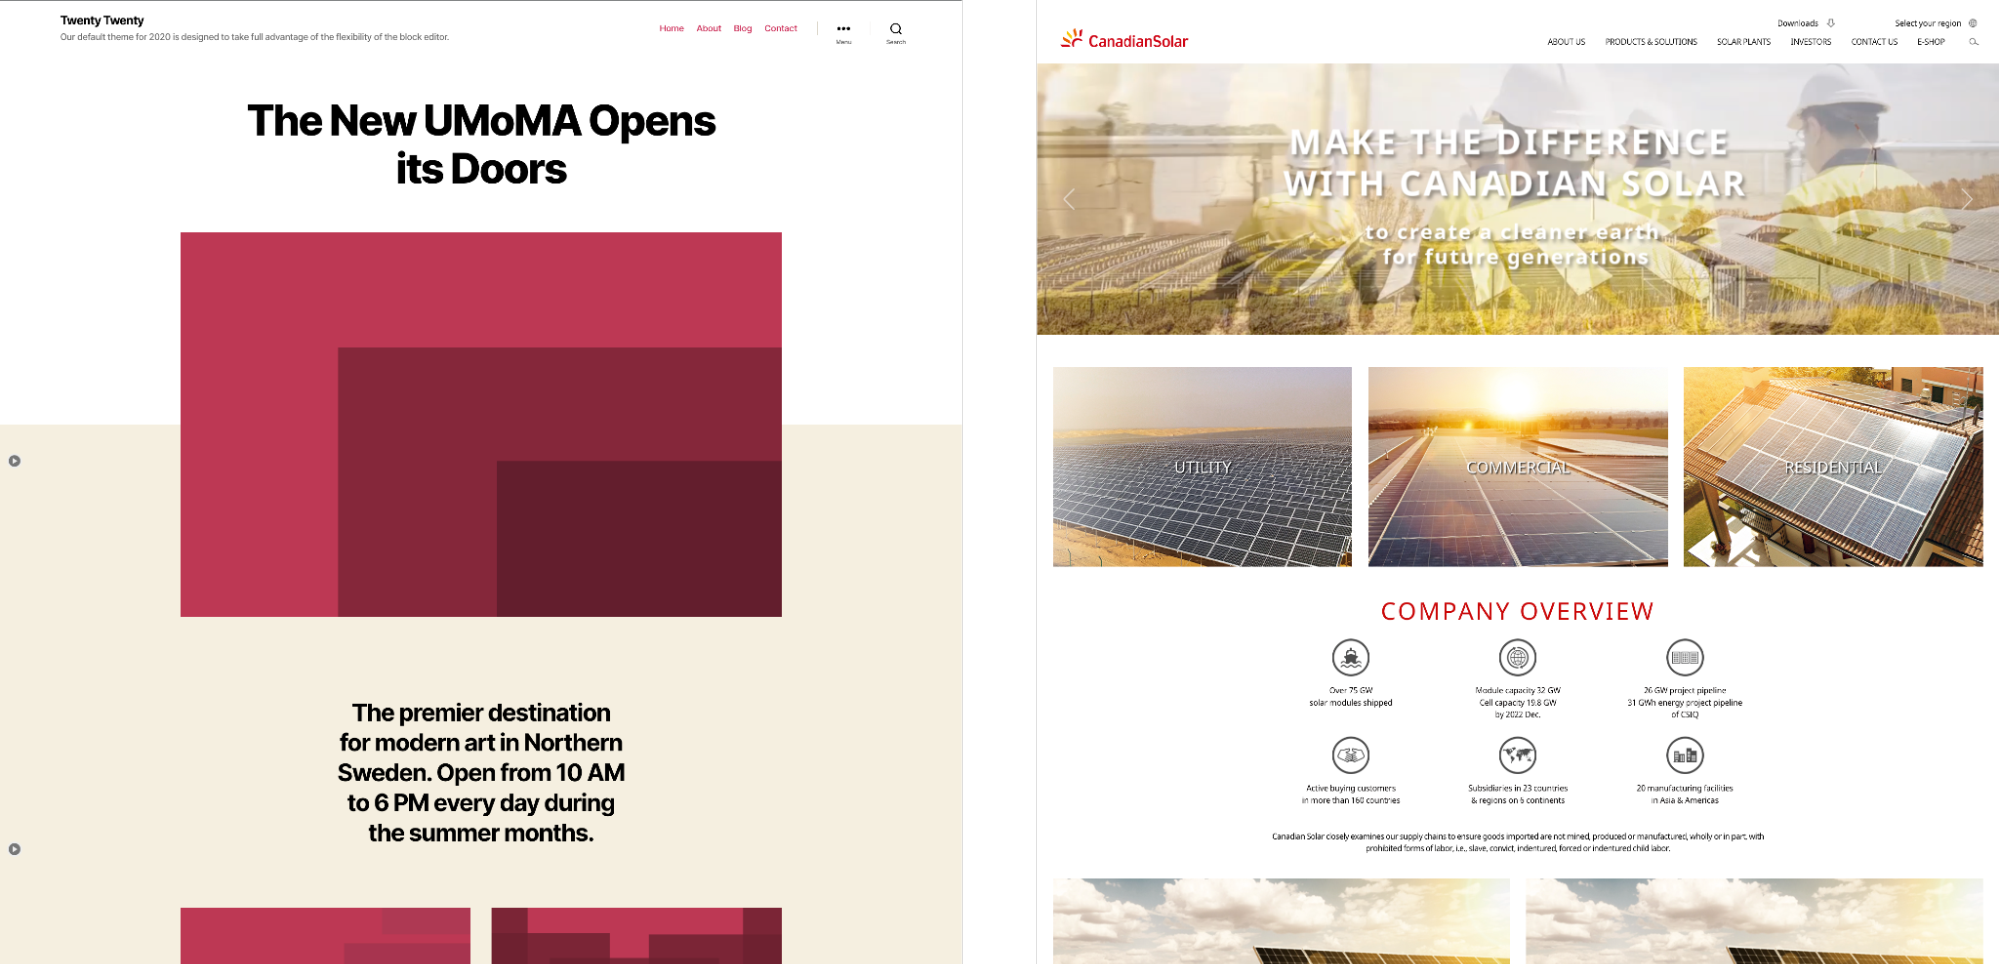
Suppose you edit your chosen theme for colors and fonts. Even then, the templates will retain their structure, as seen in the images above. This is where Webflow shines.
Webflow
With Webflow, you can use more than just premade templates. But also customize them easily to cater to your unique needs. You only drag and drop your preferred design elements, and the code is automated.
Webflow offers to design and code at the same time. Developers will quickly gauge how their HTML elements map to corresponding CSS styling controls in Webflow. Plus, Webflow is built on classes, so reusability is never an issue. Finally, Webflow creates custom interactions and animations with its powerful visual builder. The result is immersive websites with little coding.
CMS
WordPress
Although highly popular for blogging, WordPress has its own limitations. For every other functionality, you need a plugin. Add too many plugins, and you risk slowing down your load speed. Plus, installing updates and patches of these plugins makes the efficient use of your time and resources difficult.
Some core content requirements, like interactive content and SEO optimization, call for plugins. The CMS is not designed to be flexible in accommodating today's rich content needs. For instance, you need plugins to add recipes, events, or other content. Otherwise, the result is a poor user experience.
Webflow
On the other hand, Webflow has been created as a content-driven CMS. Moreover, you can alter the layout based on your rich content needs.
Editing content on the platform is straightforward with Webflow Editor. Your team members and clients can edit the content on the go, and you can track changes. More so, the layout can alter based on content requirements. That means your creativity is never stifled with the content format or post types.
Webflow has built-in SEO functionalities. You can edit Meta Titles, Meta descriptions, and slugs without logging into a dashboard.
E-commerce
WordPress
You need to install and set up a dedicated plugin to leverage eCommerce functionalities with WordPress. For example, WooCommerce.

Yet, talk to any experienced store owner. They won't recommend WordPress for scaling your eCommerce business. Slow loading, cache issues, or server configuration issues are common problems when you use the most popular WooCommerce plugin. If you genuinely want to magnify your business prospects, you need a platform that was natively designed for eCommerce stores.
Webflow
However, WebFlow offers inbuilt powerful e-commerce features like payment integrations, customized emails, or tailored shipping rules. You can also keep track of order returns and refunds. More so, Webflow empowers you to create unique product fields and highlight noteworthy features in your digital/physical product.
In a nutshell, you can deliver a cohesive customer experience that completely caters to your brand instead of being limited by your coding prowess.
Plugins
WordPress
WordPress has been in the market for a long time and has a rich library of plugins. But, all plugins are not created equal. Even those offering the same functionality will differ in their services and delivery. Hence, choosing the right plugin, free or premium, will largely determine your success with WordPress.
Generally, technical know-how is needed to choose and install these plugins. This can be a major roadblock for non-technical folks. Add to it the timely updates and security patches these plugins release. And you can end up with an extensive ongoing maintenance schedule.
Webflow
Webflow developers experienced these issues first-hand while setting up WordPress, Drupal, and Joomla for their clients, before the birth of Webflow. Therefore, they ensured Webflow was as streamlined and optimized as possible. As most functionalities are provided out-of-box, Webflow is a powerful, comprehensive solution for your (client's) online business needs.
For instance, the plugin in WordPress isn’t needed in Webflow because it’s an inbuilt functionality here.
Integrations
WordPress
WordPress allows for third-party integration by embedding relevant code snippets. For instance, you can integrate your favorite automation tool to collect leads, add them to your CMS, and send automated welcome emails. But guess what? These integrations, for example, OptinMonster, begin at a bare minimum of $348/year. And what if you need to switch one of the integrations? You will have to consider compatibility issues with multiple integrations. Plugin conflict is yet another challenge for WordPress users.
Webflow
Webflow offers third-party integrations as well with the help of Zapier.
But, it caters to core functionalities with native solutions. For instance, a native solution called Logic allows powerful automation based on custom flows. You can rely on Flow Editor to construct, test, and reuse your automation flows. Set your custom condition-based triggers and the corresponding actions to experience easy yet potent automation. You can also add external tech stacks like databases to your automation routines to leverage Logic to its most.
Hosting
WordPress
Did you know the cost of downtime for small and medium businesses was estimated to be $137 to $427 per minute? An online business with a server outage means zero traffic leading to zero sales. The bottom line is you need reliable hosting with minimal downtime.
You need to buy a domain name and hosting plan when using WordPress. Depending on your hosting, your scaling capabilities and uptime will vary. Therefore, you will have to make a judicious choice based on your storage requirements, budget, and features available for a given plan.
Webflow
Webflow offers an excellent self-hosting feature that minimizes downtime and allows easy scaling. You will need a custom domain and choose a site plan that fulfills your requirements.
You don't have to deal with extensive backend coding only to realize your website can't handle traffic spikes or face DNS issues. With Webflow, the enterprise servers are distributed globally with AWS Infrastructure, and your website visitors will get the maximum speed possible. More so, Fastly offers CDN, Security, and Network features to accelerate your page load speed.
Ease-of-use
WordPress
WordPress still needs to be figured out for average folks with tons of plugins and integrations. Choosing these solutions, installing, and maintaining them can be challenging. At best, you can always redirect your resources to create more innovative solutions instead of handling these maintenance and upkeep issues.
Webflow
Webflow has its learning curve if you have yet to gain experience with web development or design. But, if you have the right help, Webflow can get pretty straightforward.
The core difference is post-publishing maintenance that gets smooth with Webflow in contrast to WordPress, where backend maintenance is a headache.
Pricing
WordPress
The core WordPress software is free. But, as discussed earlier, you need to buy hosting and a custom domain. WordPress pricing will vary based on your hosting provider. Plus, your purchased plugins and integrations can be fairly costly as well. These costs can quickly add up to become expensive.
Webflow
On the other hand, Webflow offers a straightforward pricing model. Of course, you pay for your domain name, but you definitely eliminate the cost of dozens of plugins while using Webflow.
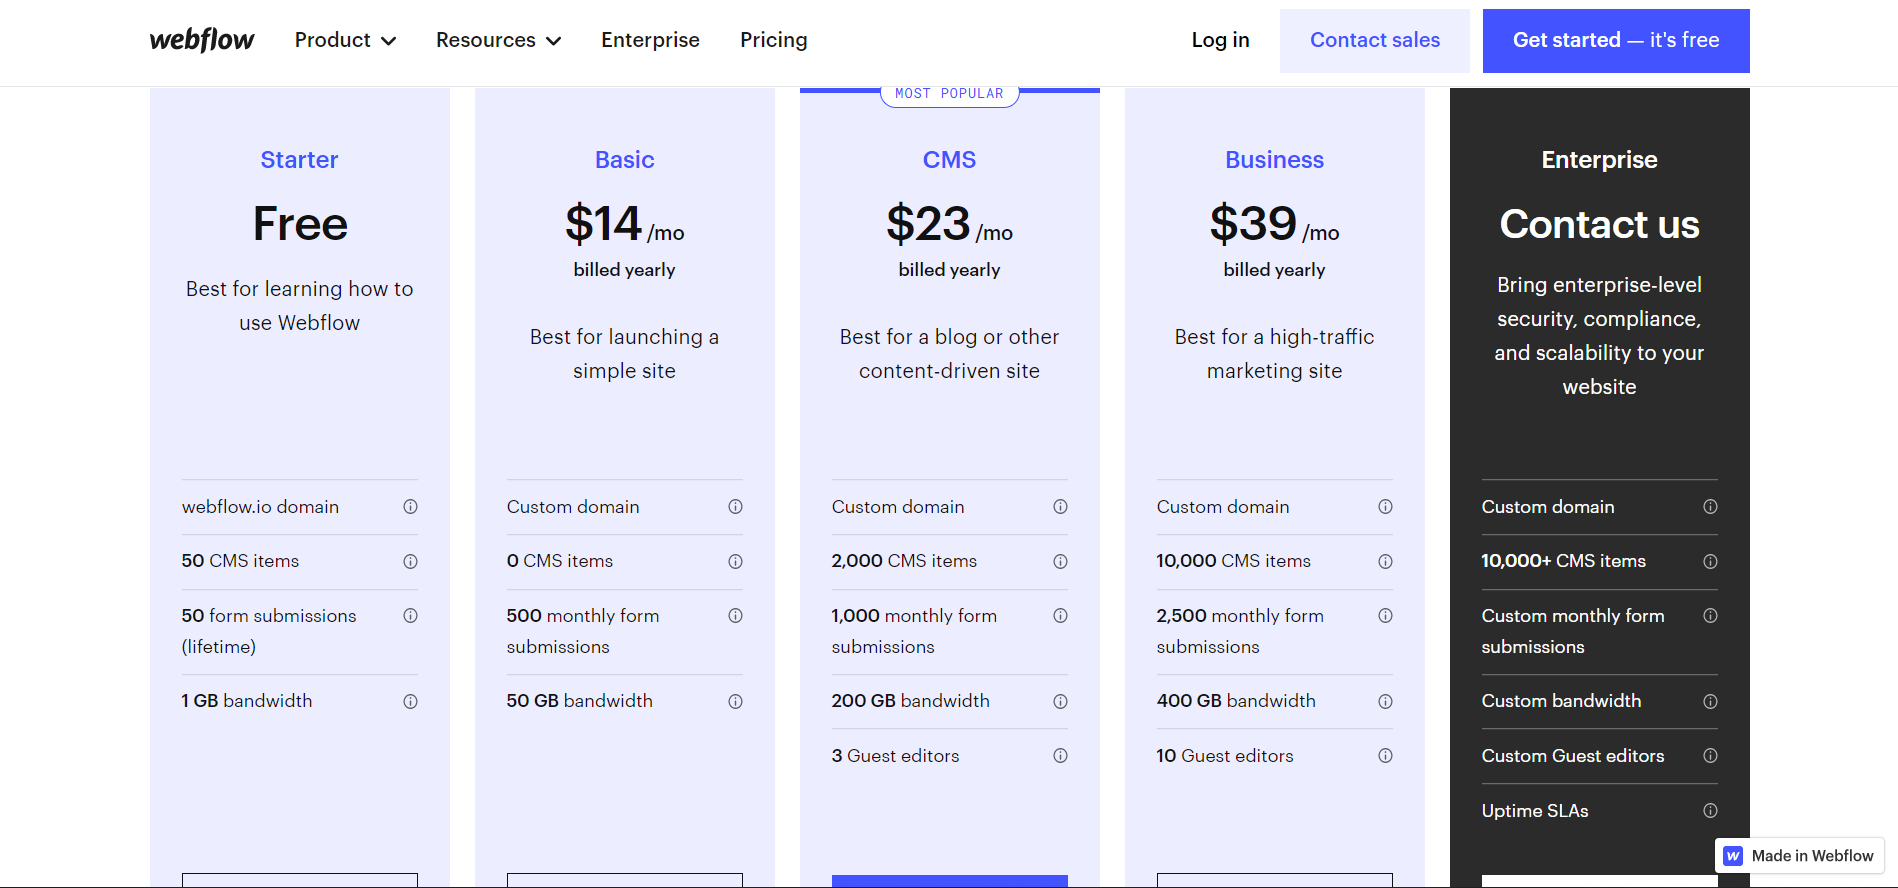
You can choose plans per your requirements. For example, you can get a webflow.io domain with the free starter plan. The other plans start at $14/per month and go up to $39/per month. Each plan caters to a different user base and has requisite features. You can also request pricing for Enterprise requirements.
Community and Support
WordPress
WordPress has a thriving community of developers that ship plugins and themes. In addition, you can get phone support and live chat support from the platform. Being an open-source platform, the community game of WordPress is high. You can find helpful resources for the DIY route or hire a WordPress developer.
Webflow
Webflow, on the other hand, is a growing base of web developers, designers, and business owners who want to leverage the cutting-edge technology of Webflow. In addition, phone support and live chat options are available on the official site. Finally, Webflow offers Webflow University and Webflow TV, designed for novice developers to learn everything about Webflow.
If you buy the enterprise plan, you will also get customer success manager to help start with Webflow.
Conclusion
Webflow is a modern alternative to WordPress. Irrespective of your technical knowledge, Webflow has exceptional features to use on the go. You can have seamless and immersive web solutions for your needs without spending weeks on development or testing with Webflow.
If you get stuck, you can always rely on experts to move ahead. Plus, you can stay tuned with us as we're committed to demystifying Webflow for developers, designers, and marketers alike. So whether you're a CTO or an upcoming developer, we're confident you'll enjoy hanging out here.
So, this was all about Webflow versus WordPress. What's your pick and why?

Did you ever realize while browsing popular sites like TED, Rakuten, or Dell that they weren't built by writing never-ending lines of code?
Of course, they use web development scripting languages. Like HTML, CSS, and JavaScript.
But, a popular no-code website builder powers these websites. Yes! You guessed it right. Webflow powers them.
What is Webflow?

Webflow is a no-code website development tool that helps deliver ready-to-publish websites, e-commerce stores, landing pages, etc., without the hassle of coding. It's a visual website builder that generates HTML, CSS, and JavaScript code corresponding to your drag-and-drop. That means you can have a fully functional website without you having to actually write code for it.
Plus, it also offers a hosting platform to host your newly developed website. Moreover, it has a built-in CMS that non-technical users can directly edit to address their content marketing needs. The best part is, Webflow also offers eCommerce solutions for building spectacular online stores.
So, Webflow is a one-in-all powerful tool that can spearhead your web development process and help deliver impeccable solutions without tedious processes, tons of revisions, or challenging maintenance chores.
If you adopt Webflow as your robust No-code tool, you can have beautiful and immersive web solutions without the need for extensive coding.
How Did It All Start?
Vlad Magdalin, Sergie Magdalin, and Bryant Chou founded Webflow in 2013 through the Y Combinator program.
The team first applied through the Y Combinator program to present their idea of visual coding. But, unfortunately, they were rejected.
Then, they shared the product on Hacker News and invited users to test the usability of their solution. They received an overwhelming response from the developer and designer community.
Based on the feedback, they optimized Webflow and re-applied to Y Combinator next season. And they were selected. This way, Webflow began its journey as a no-code development tool.
Current Scenario
Webflow has emerged as a leading no-code website builder for all the right reasons. Experts believe it will shape the future of web development. Because it's efficient, it cuts down development time while offering greater control over customization and the overall look and feel of the websites.
If you go through the following facts, you'll soon realize that Webflow is leading the parade of adopting No-code development tools. And it's just the beginning.
Webflow usage statistics
- Webflow powers 350,00,000 designers and teams
- Industry leaders like Discord, Fiverr, Dell, Rakuten, Zendesk, and so on trust Webflow.
- Equally loved by emergent players like MOONSTAR Interactive, Nyaari LLC, RM COCO, and so on. (other Workshore clients)
- Garners higher-amount of traffics than sites using other website builders, including WordPress
- Webflow has increased its user base by 67% in the past years.
Why Choose Webflow?
Well, Webflow is a popular no-code tool. But this reason doesn't suffice for anyone to choose Webflow over others.
The benefits of Webflow become clear when we compare the traditional development cycle with Webflow's development cycle. Typical web solutions take anywhere between 150-500 hours of work.
The typical web development cycle is as follows:
- Project Discovery and Planning
- Designing
- Coding
- Content Development
- Testing and Debugging
- Launch
- Maintenance
But, the web development cycle with Webflow looks like this:
- Project Discovery and Planning
- Content Development
- Designing
- Update Content
- Launch
So, developing with Webflow cuts down the development time significantly because the code is auto-generated by the platform itself when you are busy designing. Unless you are using custom code for integrations and such, you can build a website with Webflow in less than 3 hours.
Are you still unsure of what difference Webflow can make to your web development? Here's how Webflow can bring value to your work.
For Developers
Webflow is your junior coder, but much more learned and polished. Using Webflow is quite like coding in power mode. There are no syntax errors to fix or wondering why your code isn't responsive to a particular browser or screen resolution.
Automate your work and dedicate your time and prowess to build robust integrations or innovative features in your web solutions. Plus, you get powerful hosting, so you never have to worry about server downtimes.
For Designers
The vision of Webflow has always been to empower non-coders, especially designers, to create customized and responsive websites without coding knowledge. You're good to go if you have a basic understanding of how websites function.
No more miscommunication with the development team. Every element caters to your imagination and creativity without sacrificing load speed or functionality.
For Marketers
The speed of the Webflow development cycle supports faster A/B testing of websites and landing pages during crucial launch times. Marketers can benefit immensely from social commerce options in Webflow.
The inbuilt SEO features of Webflow bring meaningful online traffic to your website. More so, you can exert full control of how search result pages appear.
For Creators
Creators and solopreneurs can leverage Webflow's automated website building to create a professional online presence. They can build gated communities and monetize their content. Plus, Webflow offers content-driven designs, where designs can adapt as per content needs, instead of the other way round.
This content-first approach is in contrast to traditional blogging platforms like WordPress that weren't designed with content needs in mind.
For Business owners
You need not put in an upfront investment for your next big idea to take off. Don't pay until you're ready to launch your website and product to the world. Save billable hours with faster execution. Get immersive websites that are a breeze to maintain without the aid of professional developers.
So, you already know how each user can benefit from Webflow.
Here's the list of Pros that make Webflow the go-to solution.
Pros
- Placing design at the center:
As mentioned earlier, Webflow was originally developed for designers. Use advanced design elements like Lottie integrations, micro-interactions, and animations to make your website stand out.
- Ultra-fast delivery:
As the development time is zero or negligent, Webflow users can save a lot of billable hours on pricey development. And launch your business as soon as possible.

- Next-gen CMS Solutions:
You can use in-built templates or create custom content types to use rich content. It's possible to make on-the-go layout changes. Importing and exporting content is a breeze.
- Out-of-the-box SEO:
Auto-generated XML sitemaps help in SEO optimization. You can customize 301 redirects, alt-image texts, meta titles, and other SEO-critical factors to boost organic traffic.
- Excellent security measures:
Webflow offers a free SSL certificate. It is also GDPR compliant and ISO 27018 compliant.
- Modern E-commerce solutions:
Webflow helps eCommerce owners to offer multiple payment options. Right from the checkout journey to eCommerce emails, Webflow can customize all this to suit your needs. Plus, you can avail of online tax calculations for perfect pricing.
- Automatic back-ups:
You can mark and save versions of your website. You can also benefit from automatic security reviews and patch-ups from the platform.
Now, it's time to understand the potential drawbacks of Webflow that can stop you from fully leveraging its power. Here's a rundown of its disadvantages.
Cons
- Integrations are tricky for novice users:
Most users stumble when it comes to integrating third-party plugins. - Not beginner-friendly:
Someone completely new to web development may find it challenging to create fully functional websites, even with Webflow. A complete beginner will also have a learning curve in design aspects, let alone coding.
The good news is there are 2 ways to overcome these pitfalls.
- Preliminary knowledge of development or design may help.
- If you’re unfamiliar with these subjects, you can always avail of professional help to get it sorted.
Case-study Sites That Use Webflow
Would you want to see Webflow in action? Here's a website we developed for our client, MoonStar Interactive, a gaming startup. The website offers a wholly immersive experience. Every design element, like the menu bar and background animations, caters to the brand ethos.
Webflow can help create interactive and attention-grabbing websites and eCommerce stores to deliver a one-of-its-kind experience to your end users.
Concluding Remarks
Clearly, Webflow is a fantastic tool to create immersive websites to bring your next big idea to life. It offers a drag-and-drop solution for non-coders to build their websites, online stores, and more. Though, our experience with our several clients reveal it can be challenging for complete beginners.
So, we have now covered bases on Webflow and how it works. Do you have any doubts?
We at Workshore, will be more than happy to address your doubts. You can stay tuned with us to read our upcoming blogs and get all your questions answered.